


In this article, we will explain how to configure ApexSQL Audit to track before and after changes on insert, update and delete operations and how to investigate change details including who made them, how and when.
Transcript:
Hello and welcome to this ApexSQL Audit video on before-after auditing. In this video, we are going to show you how to setup ApexSQL Audit to audit before and after values in the event of insert, update and/or delete operations. In addition, we’ll demonstrate how to setup alerting on specific before-after events and how to create comprehensive auditing reports based on auditing of before-after values.
How to configure before-after auditing
- Audit exact before and after values on insert, update and delete operations
- Create and investigate alerts
- Create and run reports
ApexSQL Audit is a SQL Server auditing and compliance tool which allows auditing of almost 200 SQL Server events. Audited data is stored inside its own tamper-evident central repository database which encrypts audited before-after values to ensure maximum security of the sensitive data. ApexSQL Audit also provides powerful alerting and reporting mechanisms which allow users to be alerted on specific auditing events as well as to create and automate reporting of various built-in or custom reports.
ApexSQL Audit
- SQL Server auditing and compliance
- Audits almost 200 events
- Tamper-evident database
- Encrypted values
- Alerting
- Built in and custom reporting
In order to audit before-after values, ApexSQL Audit leverages database triggers which are created directly on the audited tables. Once created, these triggers will ‘fire’ on each and every insert, update and delete events, based on the implemented configuration down to the table-field level. Changes will be tracked on the exact field value before and after the operation is executed.
Before-after auditing
- Leverages database triggers
- Table field level configuration
To start the process, first install ApexSQL Audit and start the application.
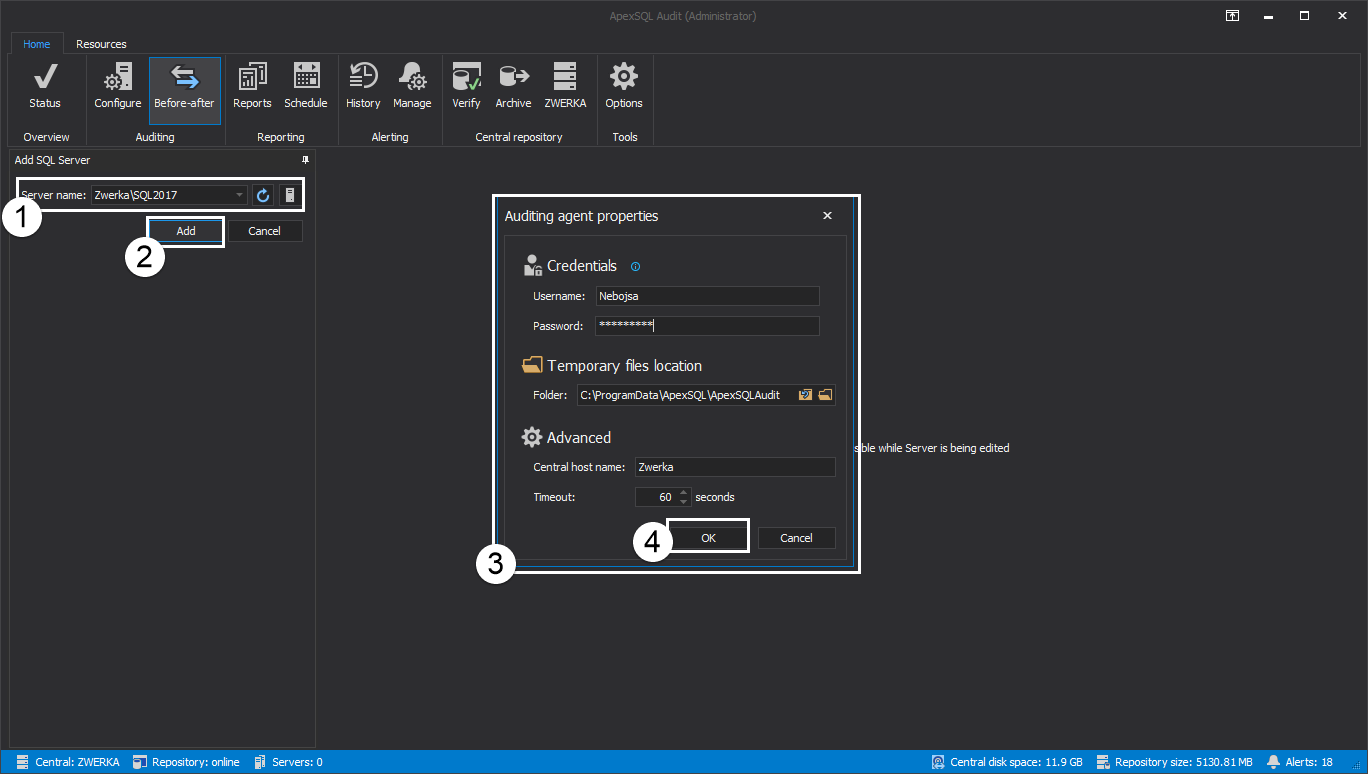
Next, let’s access the auditing configuration screen by clicking on the ‘Before-after’ button in the main ribbon. Next, let’s add the SQL Server instance which hosts the database we want to audit for the before-after changes by clicking on the ‘add server’ button and selecting the SQL Server instance from the drop menu.
Alternatively, we can manually type the SQL Server name or click on the ‘browse servers’ button and select local or remote SQL Server instance and click ‘Add’ to finish.
In the ‘Auditing agent properties’ dialog, we must provide the windows administrator username and password, and can also change location where the temporary files are stored or change name of the central host we are connecting to as well as connection timeout. Once everything is set, click ‘OK’
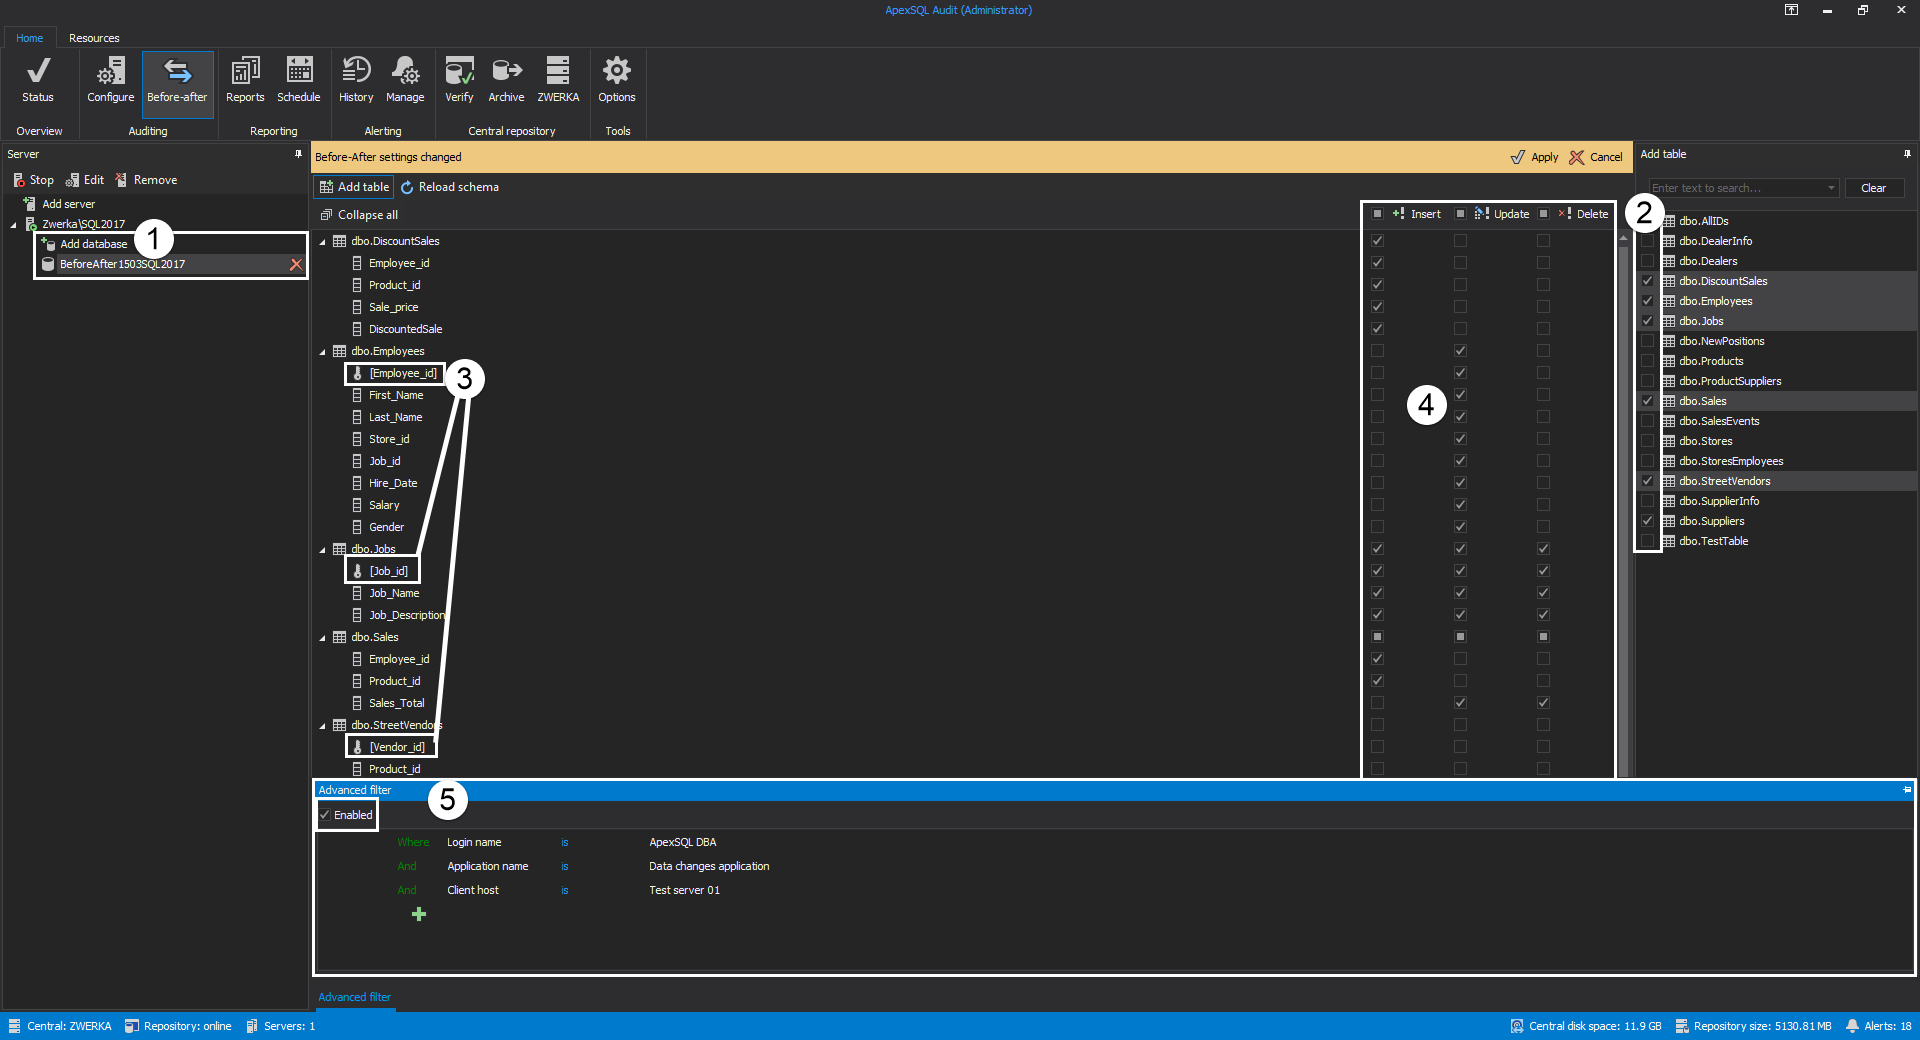
Next, click on the ‘add database’ button, then check databases which will be audited for before-after changes and click on the ‘add’ button. Now, in the ‘Add table’ dialog, check tables for auditing and they will be added to the central form where we can now also see exact columns for each added table. Columns that are assigned as primary key are marked with the ‘key’ icon and placed in brackets.
Now, we can configure actual auditing on the column level for each operation, so let’s check insert, update and delete checkboxes on the appropriate columns and tables.
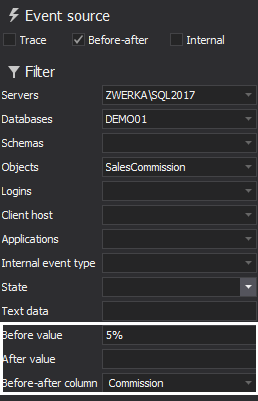
Last, but not least, we can achieve even greater precision by utilizing an advanced filter which can be enabled. Here, we can combine logical conditions to specify the exact cases in which before-after auditing will be triggered. For example, we can configure our advanced filter to look only for events coming from a specific SQL Server login which come from a specified application and client host. Once the filters are set, click on the ‘Apply’ button and configuration will be saved.
This process can be repeated for multiple SQL Server instances and databases. Simply add the database and configure auditing filters and advanced filters and apply once ready
With this, the auditing configuration process is finished and before-after values on the specified tables and columns will be audited as per applied configuration.
Now that we’ve seen how to configure auditing, let’s focus on reporting.
But first, let’s look at a typical use case where ApexSQL Audit can be used to identify some unexpected changes in a particular table. Let’s quickly observe table ‘Sales commission’ table which includes 3 columns: ID, SalesPersonName and commission. In its original state, here is how the table looks. We can clearly see that by the original state of the table, all sales persons had same commissions of 5%.
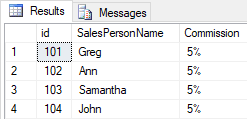
Keep in mind that we have an active auditing for before-after values on the mentioned table, so let’s see what was audited by ApexSQL Audit in case someone changes commission values for two of our sales persons to 10%.
Updates two commissions to 10% in SSMS
Clicking on the Reports button in the main ribbon will bring up the ApexSQL Audit reporting pane.
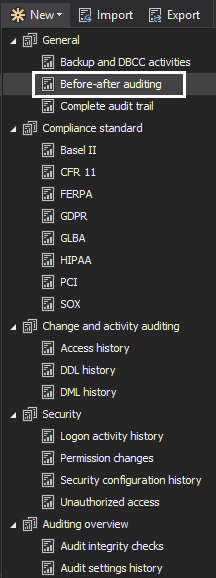
While we can use any built-in report as a starting point, for the purpose of this video, let’s click on the ‘New’ button and select the ‘before-after auditing’ report. Note that only insert, update and delete operations are selected, and that we are only using before-after events as a source for the report. Additionally, we can use variety of filters to enhance the precision of our report, starting with the server, database, login, date, time and other filters.
Once our filters are set, click on the ‘Preview’ button to create a preview of our report. Immediately we can spot that our table has been updated. Here <1 sec pause> we can see the before value for our commission value, which was originally 5%, and here <1 sec pause> we can see the value after the change is now 10%. It is the same for the other sales person. If we check the available information, we will see the exact time the change was made, who made is, via which application, where did the user connect from, and more. This information can be used to determine if this was indeed an unexpected change or not and we can take appropriate actions if necessary, like reversing the change.
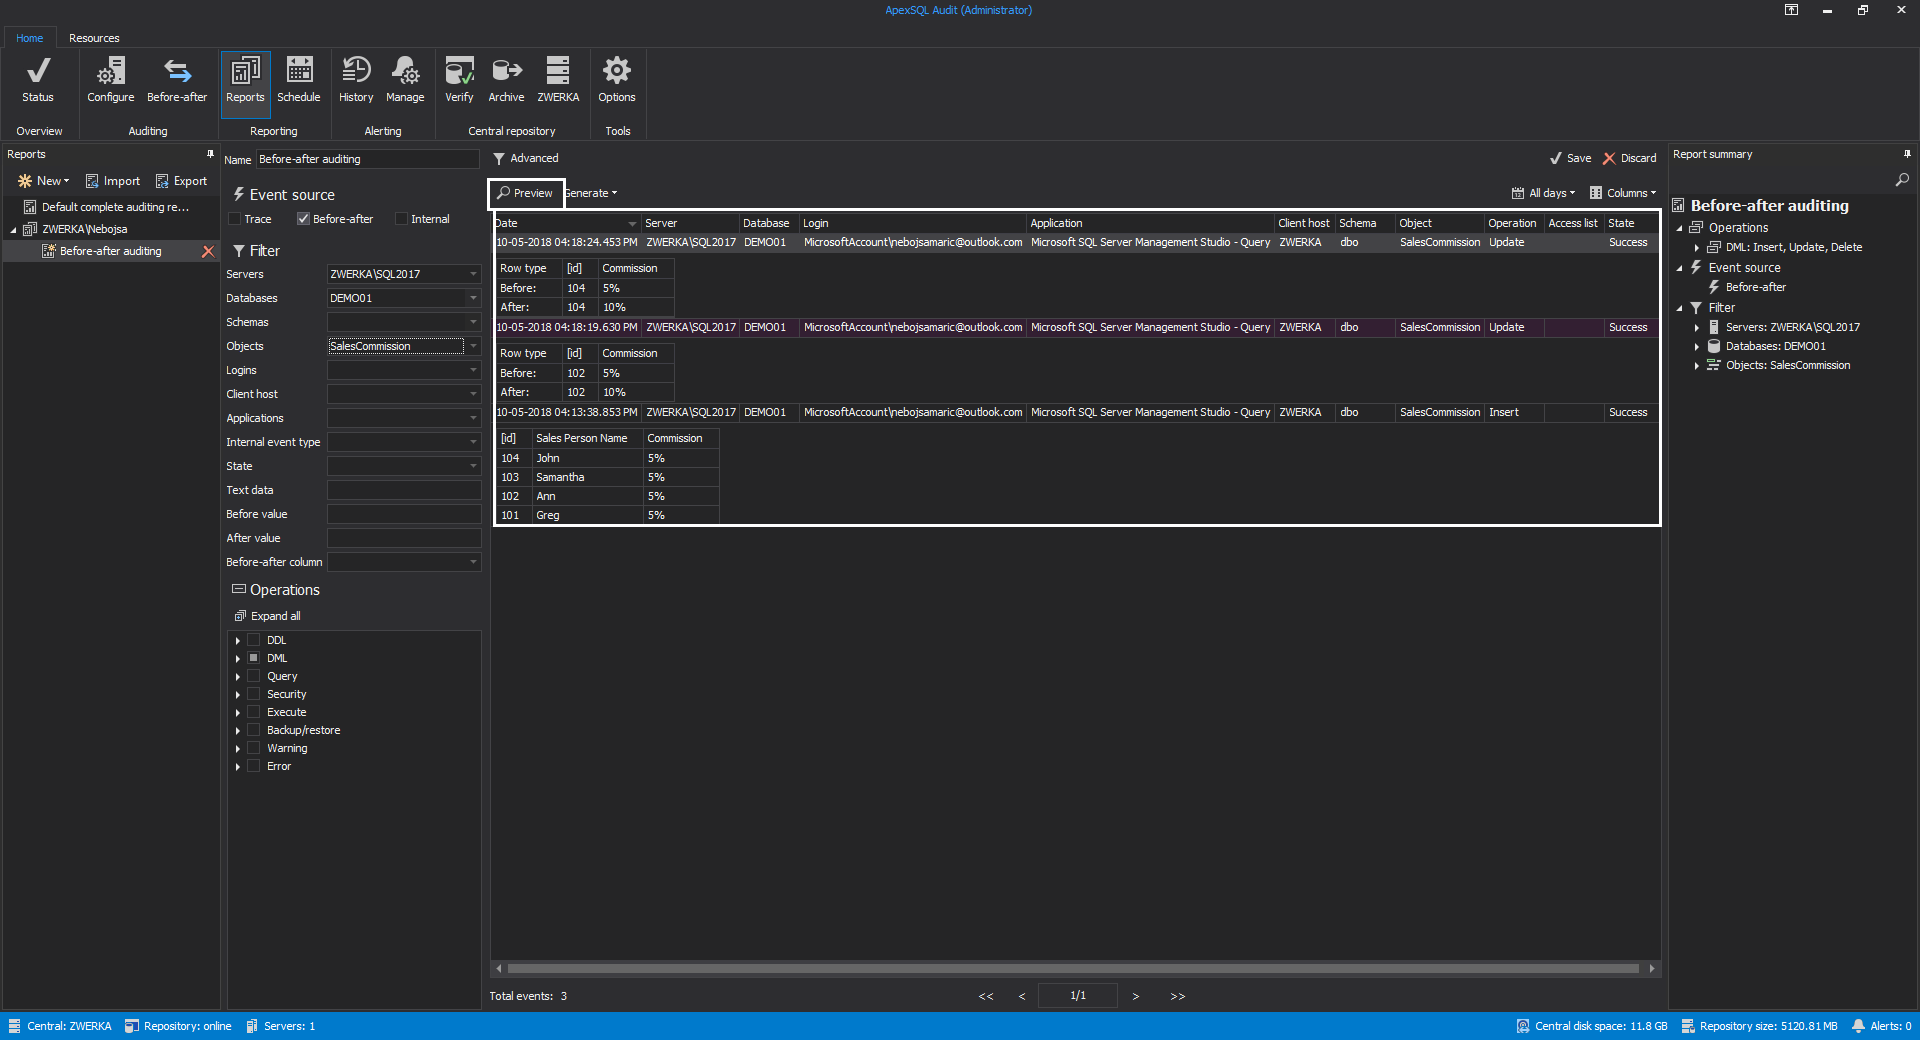
To help with the before-after reports and allow users to easier navigate through them, ApexSQL Audit has specific report filters which focus on the before after auditing and allow users to filter per columns or even per exact values before and after the change.
Once the report is finalized, we can save it by providing a name and clicking on the ‘Save’ button, as well as immediately generate it in one of the supported formats by clicking on the ‘Generate’ button and opting for the report file format. Alternatively, these reports can be scheduled to be run automatically on a pre-determined frequency by running the ‘Schedule’ wizard in the main ribbon and setting up schedule parameters.
Finally, let’s see how to add alerts which will notify us on a specific before-after auditing event.
In the main ribbon, click on the ‘Manage alerts’ button. Here, we already see some existing built-in, as well as custom, alerts but we want to create a new one for our case, so click on the “New” button.
In the first step of the alert wizard, choose the “Before-after alert”. In the next step, we can specify the title of the alert notification as well as chose various information which will be included, such as the database name, table name, login, and more. Once we customize the alert title and body, click next to proceed.
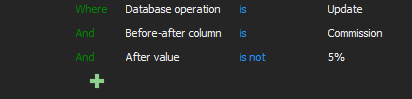
Now, chose one or more SQL Server instances where the alert will be active and click Next to proceed further. Now, we need to specify conditions which will trigger our alert. Looking back at our example, let’s set conditions which will ensure we are alerted if someone changes the commission value. So, let’s first add the condition that the operation in question should be ‘update’. Adding another condition which will state define affected column – ‘Commission’ in our case, as well as another condition which will ensure we are alerted if the value is anything different than 5%.
With this, we have set our alert to be triggered in case someone updated the commission with any value different than 5%.
Once the conditions are set, click on the ‘Next’ button to proceed. In this step, we can choose to have our alert written inside the Windows event log, or even sent via email to pre-determined webmail addresses using the simple mail transfer protocols (STMP in short). To use this option add profiles which include recipients email addresses (which can be configured in the application options). Click next to proceed to the final step where we will see an alert summary and can choose the name for our alert. Clicking on the “Finish” button creates the alert which is immediately active and will alert us on any event which triggers our configured conditions.
Triggered alerts can be seen in the alert history pane accessed by clicking on the “History” button in the main ribbon.
Thanks for watching. For more information, please visit apexsql.com


