


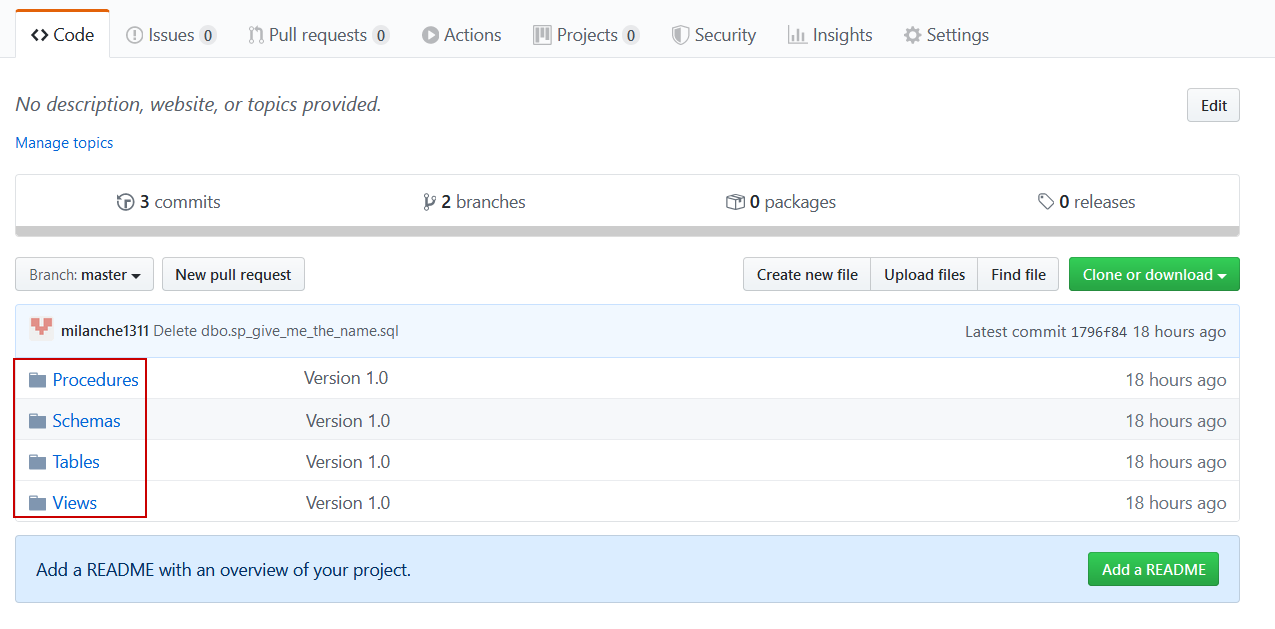
This video will cover database baselining, provisioning, committing code to source control, setting continuous integration, and continuous delivery pipelines through ApexSQL DevOps toolkit solutions with advanced workflow customizations.
Transcript
Hello, and welcome to this tutorial on managing database lifecycles through automation capabilities of ApexSQL tools and ApexSQL DevOps toolkit – Web dashboard, a standalone, web-based continuous integration, and continuous delivery solution.
Source control
For the final step of baselining it is necessary to link the newly created development database to a source control system and commit all objects of the current database in their scripted version to a hosted repository. For that purpose the ApexSQL Source Control tool, an add-in for SQL Server Management Studio should be used. It is strongly recommended to use this tool as it will create the correct folder structure in a repository which is necessary for the ApexSQL DevOps toolkit to be able to use it as a viable data source for continuous integration part of a database lifecycle:
There are two possible scenarios in this situation. One is that there is already a SQL code of some previous database version located in a repository and needs to be branched and updated to the latest version, and the second scenario is where there is yet no code in a repository. We will consider a more likely scenario for this tutorial where previous database lifecycle iteration is present and there is old database code in the repository, but in both cases linking procedure would be the same.
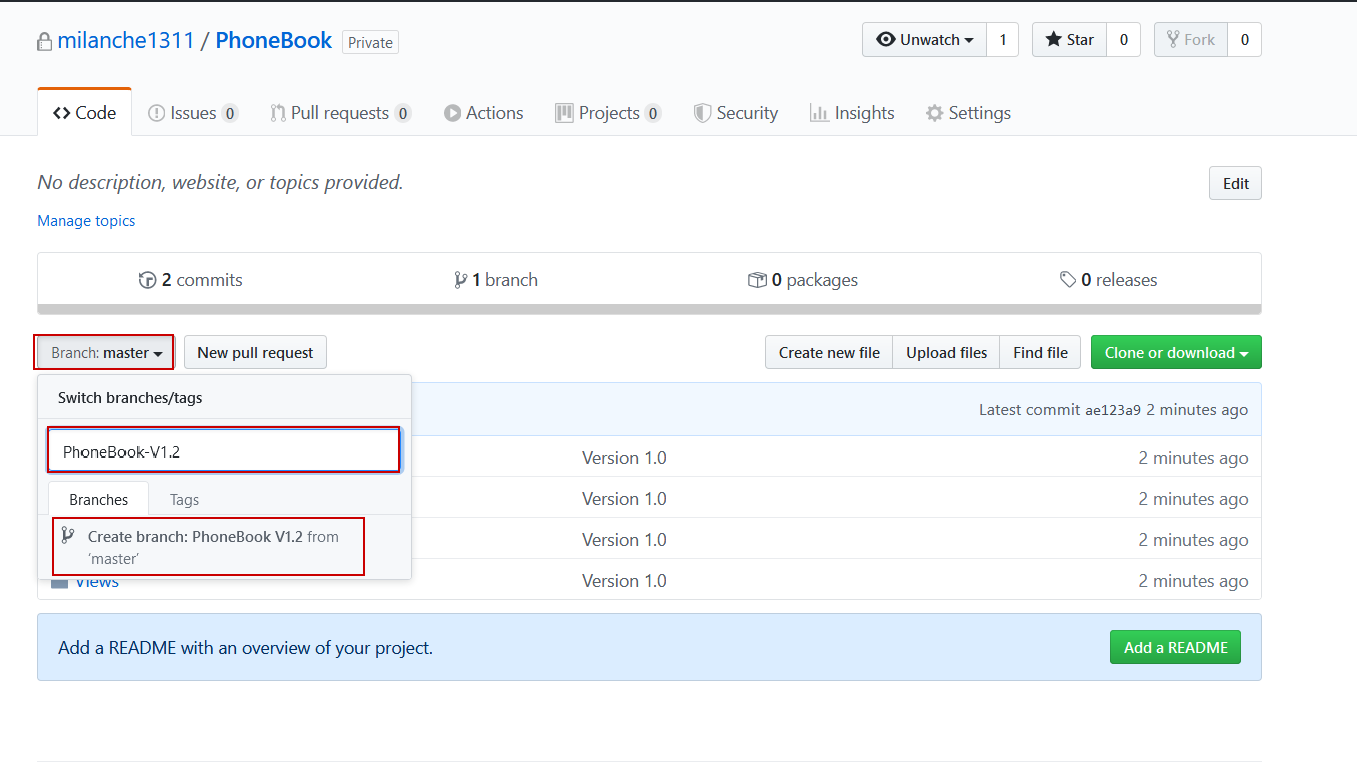
Code versioning best practices indicate that the version should be branched with every database lifecycle, so we will create a new branch where updated code will be located. The following shows a branching procedure for the GitHub repository host. Go to the Branch dropdown dialogue, enter a new branch name and click on the Create branch from ‘master’:
We can now proceed with database linking. To link a database to a source control repository, simply right-click on the development database in the Object Explorer and choose the Link database to source control option from the context menu and the configuration window will show up:
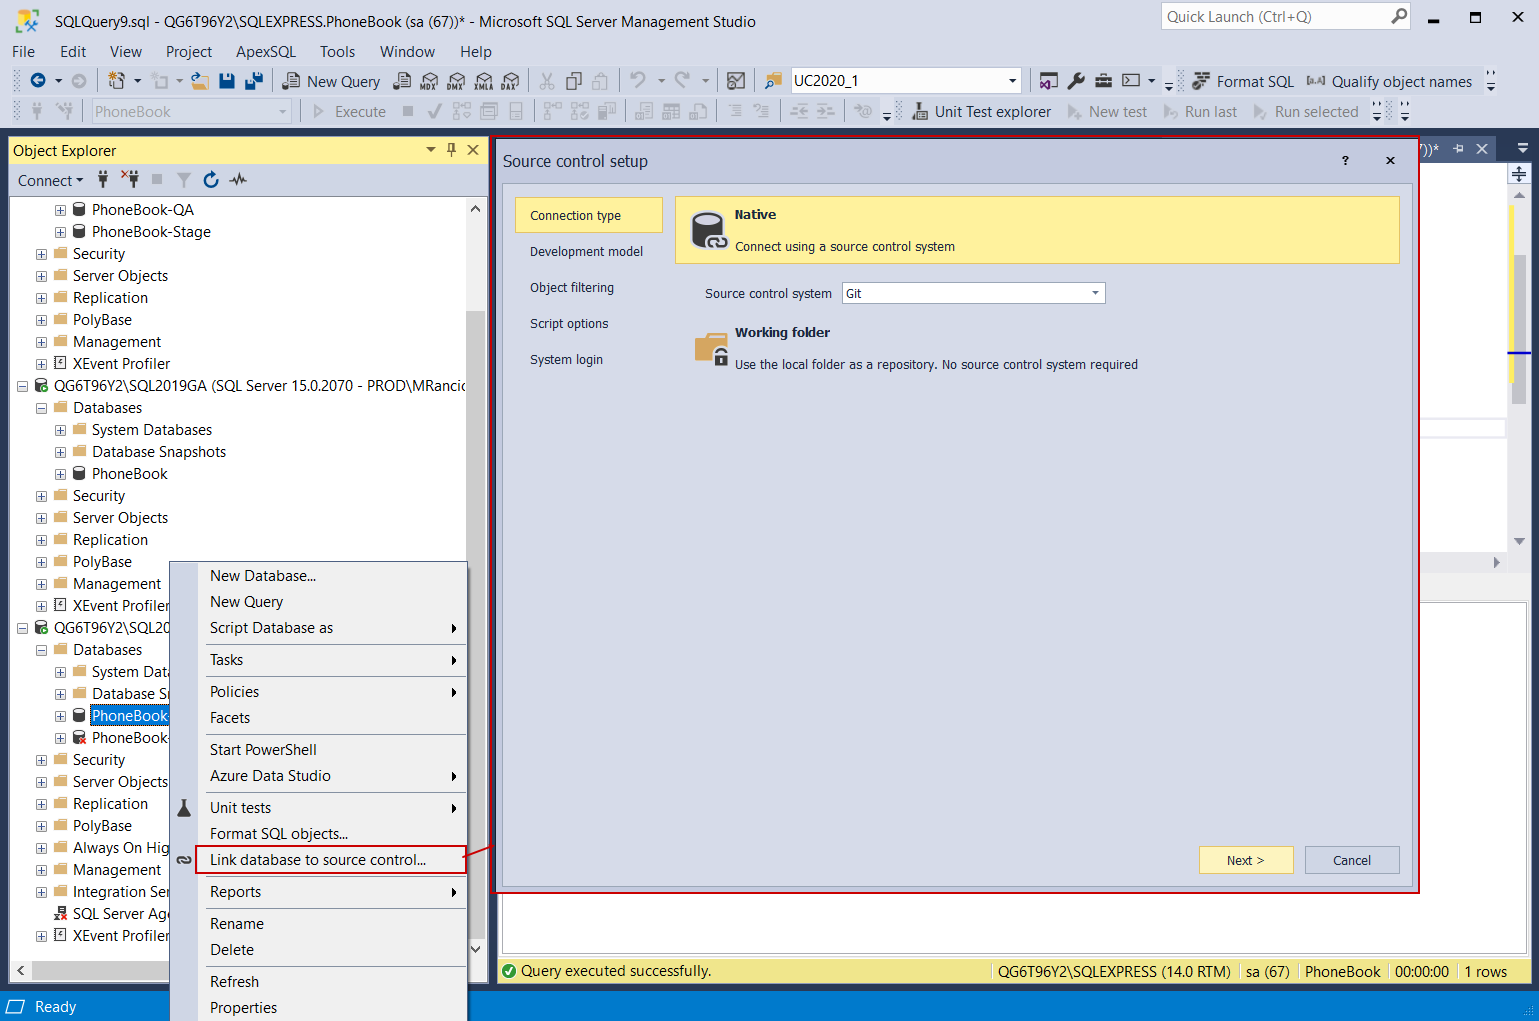
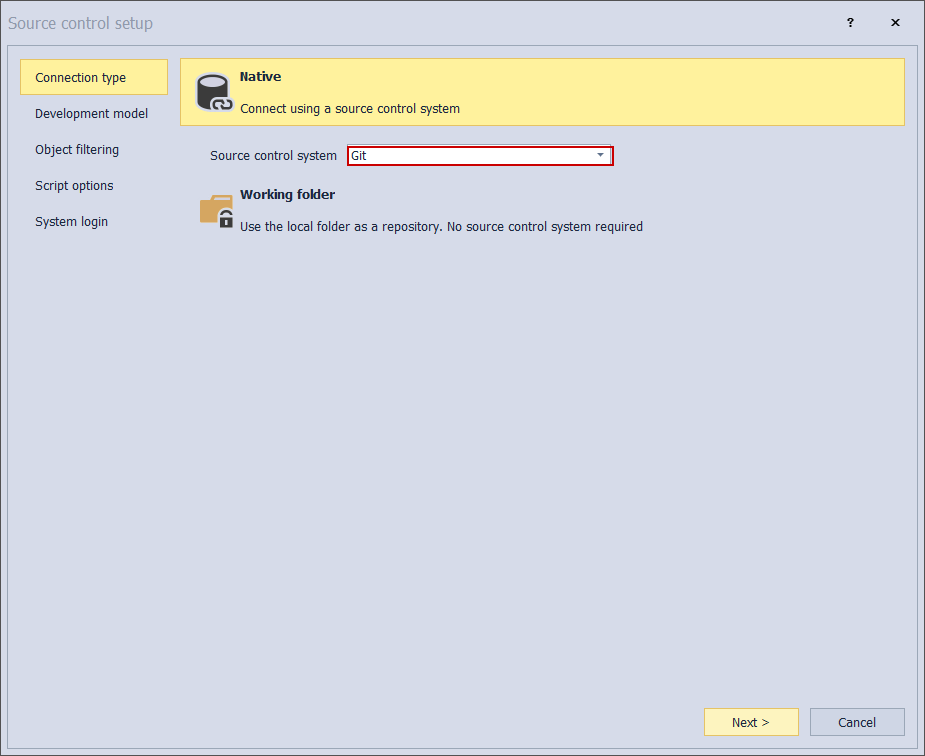
For the first configuration step, choose the Connection type that will be used, in this example repository is in the Git type source control system:
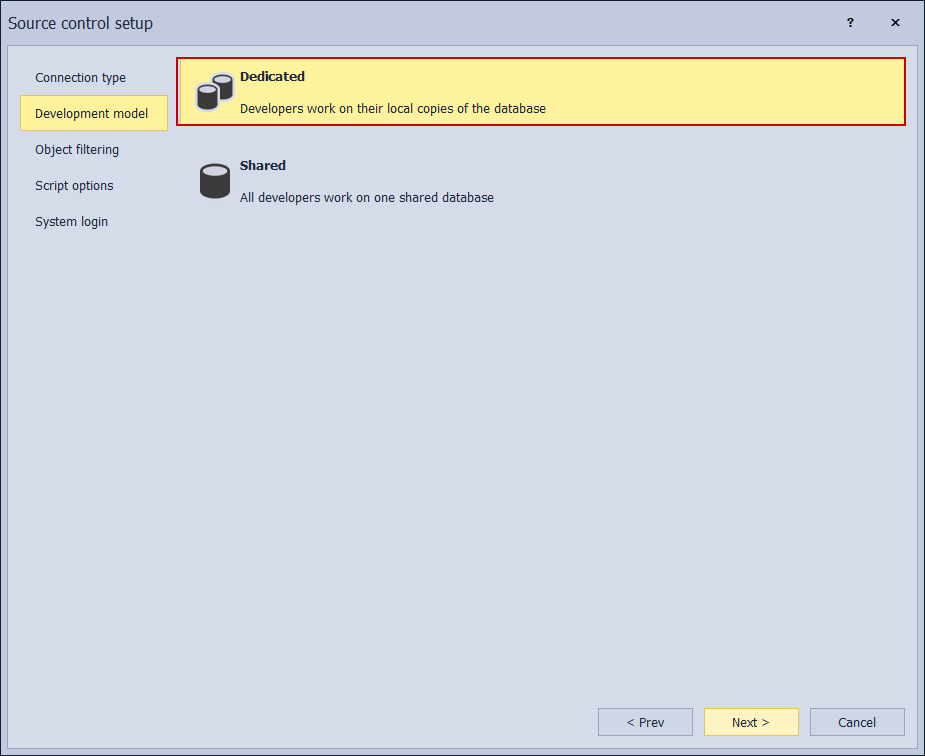
The next step is to choose a development model, if it is going to be a dedicated or shared model. The shared model allows concurrency which means that multiple developers can work on a single database but object locking per developer will be possible. Assuming that different developers will work on entirely different database schemas it would be safe to choose the dedicated model:
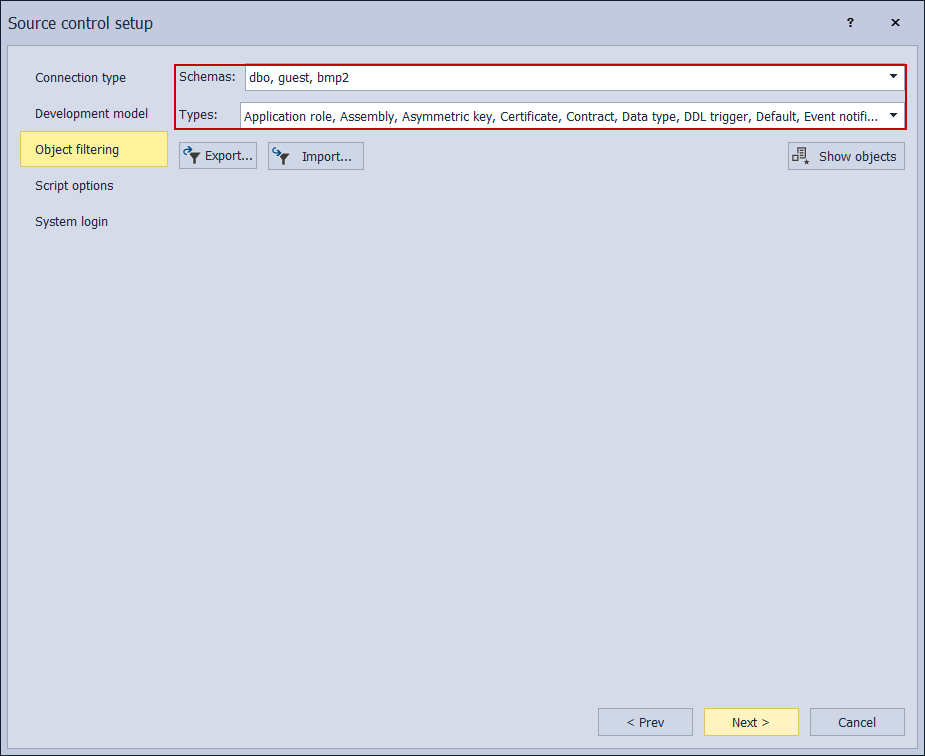
Object filtering specifies the scope of objects which will be considered for upload to a repository. Since this is still a baselining procedure’s default settings, which considers all objects, should be chosen:
Further on, the Script options tab provides which object attributes will be ignored during comparison with a code in a repository. This means since there is an existing object in the target repository and when compared with the corresponding object in the source database it would be possible to ignore some differences between them and the code for this object will be presented as equal. Whether the target repository is empty or contains code for some previous database version, to ensure proper baselining all attributes should be considered for comparison and committed to the target repository. Only the Replication triggers and the System objects ignore options can be considered checked as those usually do not migrate easily and are not necessary for the regular database lifecycle:

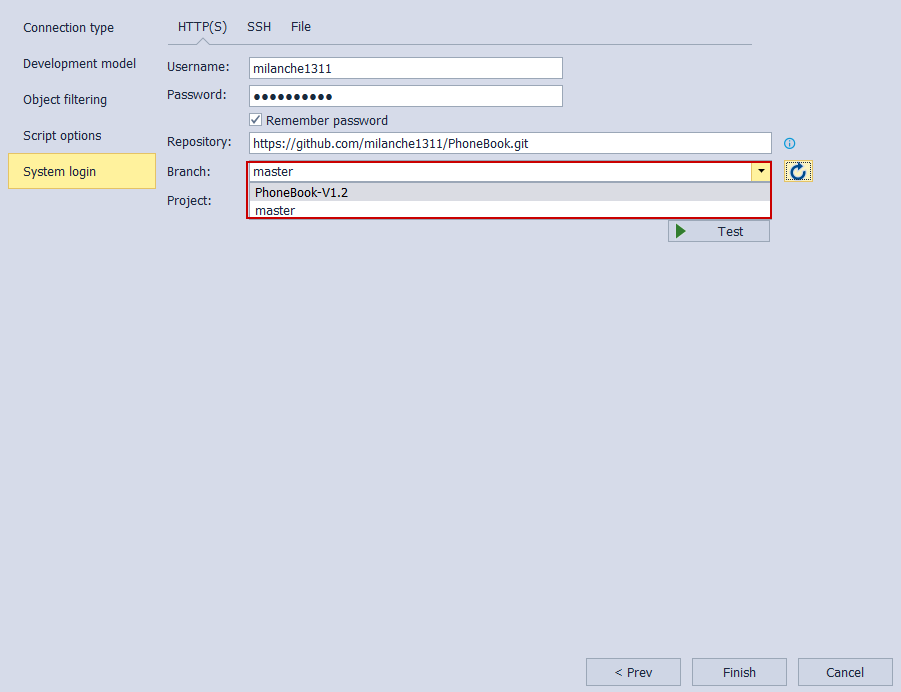
In the end, the connection parameters to the source control system should be provided. This is where a proper branch should be selected based on the situation in the repository. This means that if the new branch was created based on an old database version, this branch should be selected which is the case in this example:
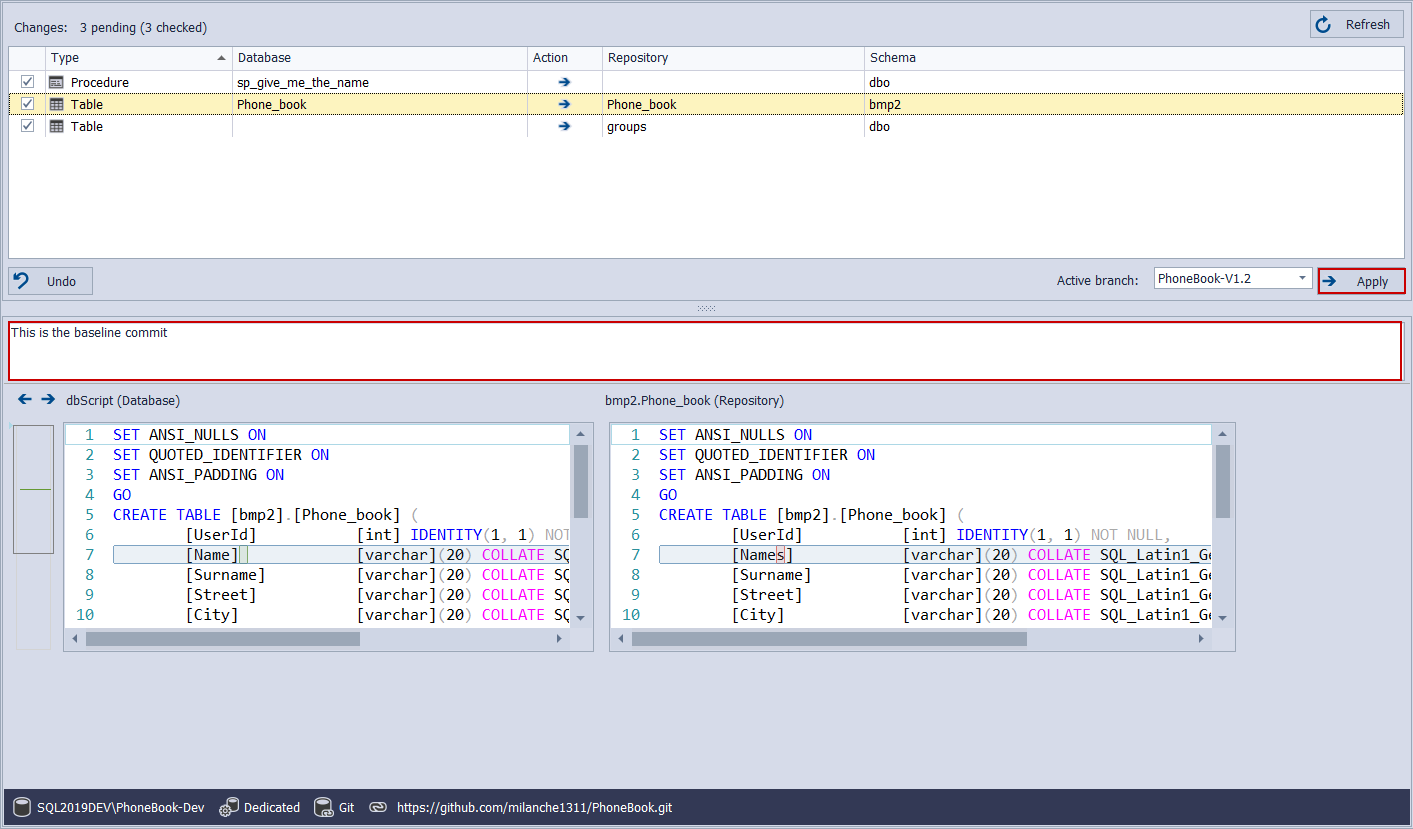
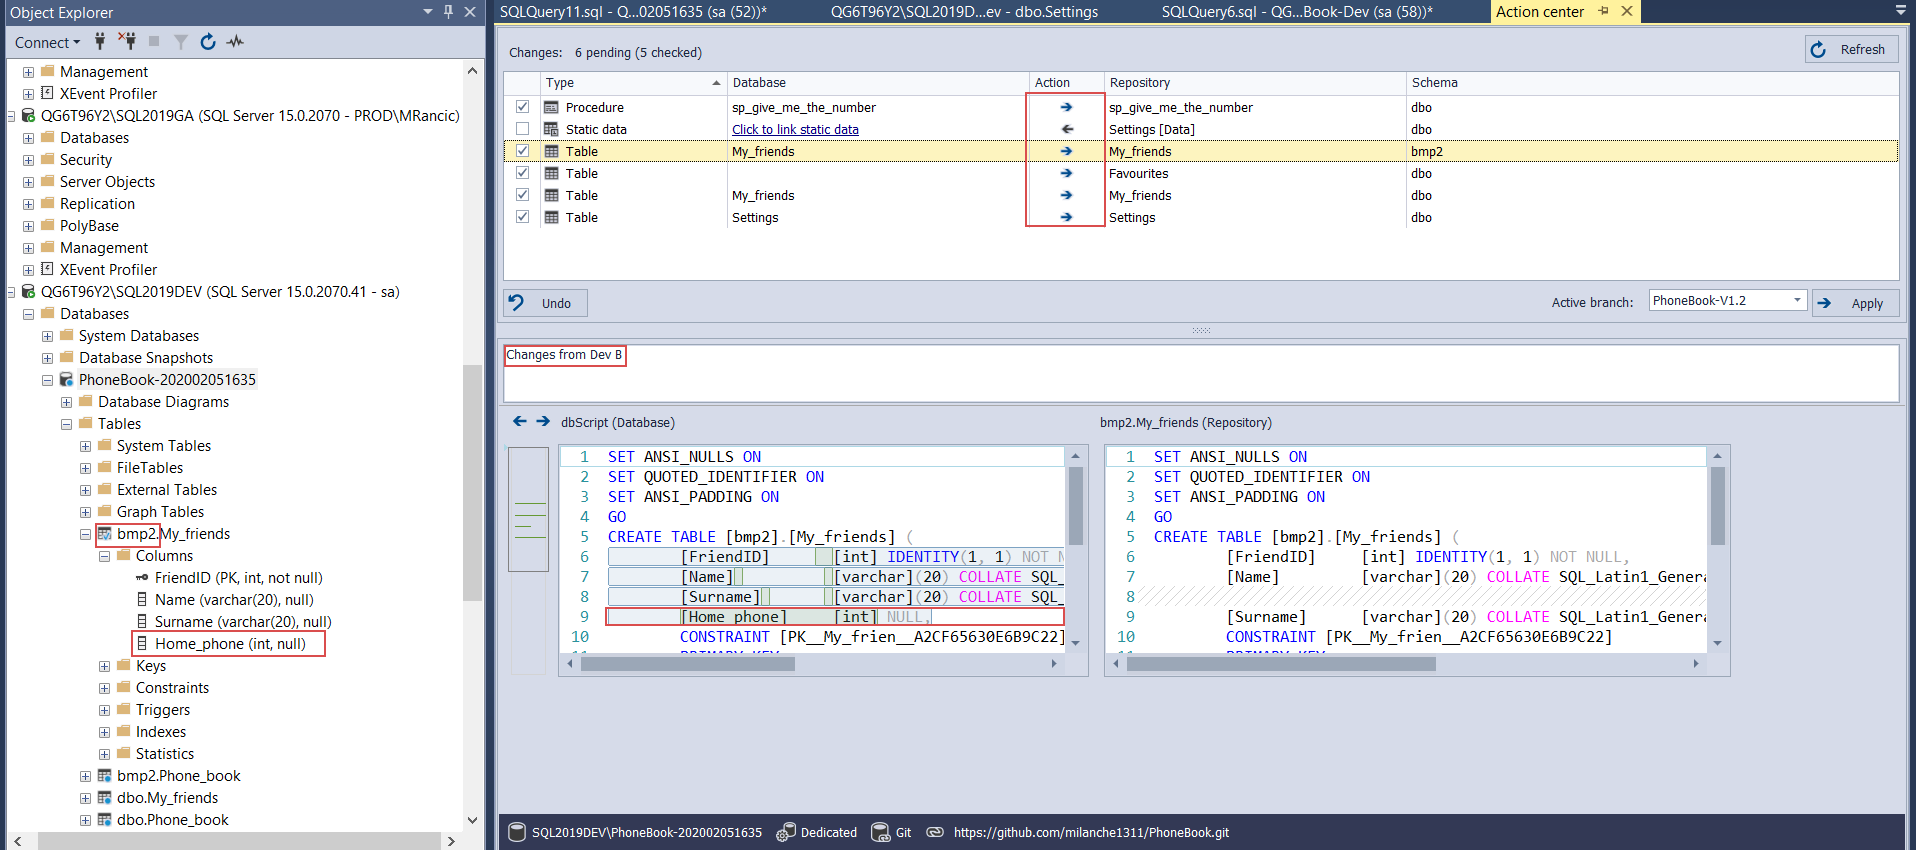
After a successful connection, the Action center will appear with all source database objects selected to be synchronized with a repository. It is necessary to review the list of objects and check the direction of synchronization. In case there are objects in repository that are missing in the development database, the Action column will display synchronization direction for that item from right to left. This direction can be changed by clicking on the direction arrow as baselining with the latest version should be established. The same applies when objects exist on both sides but are different:
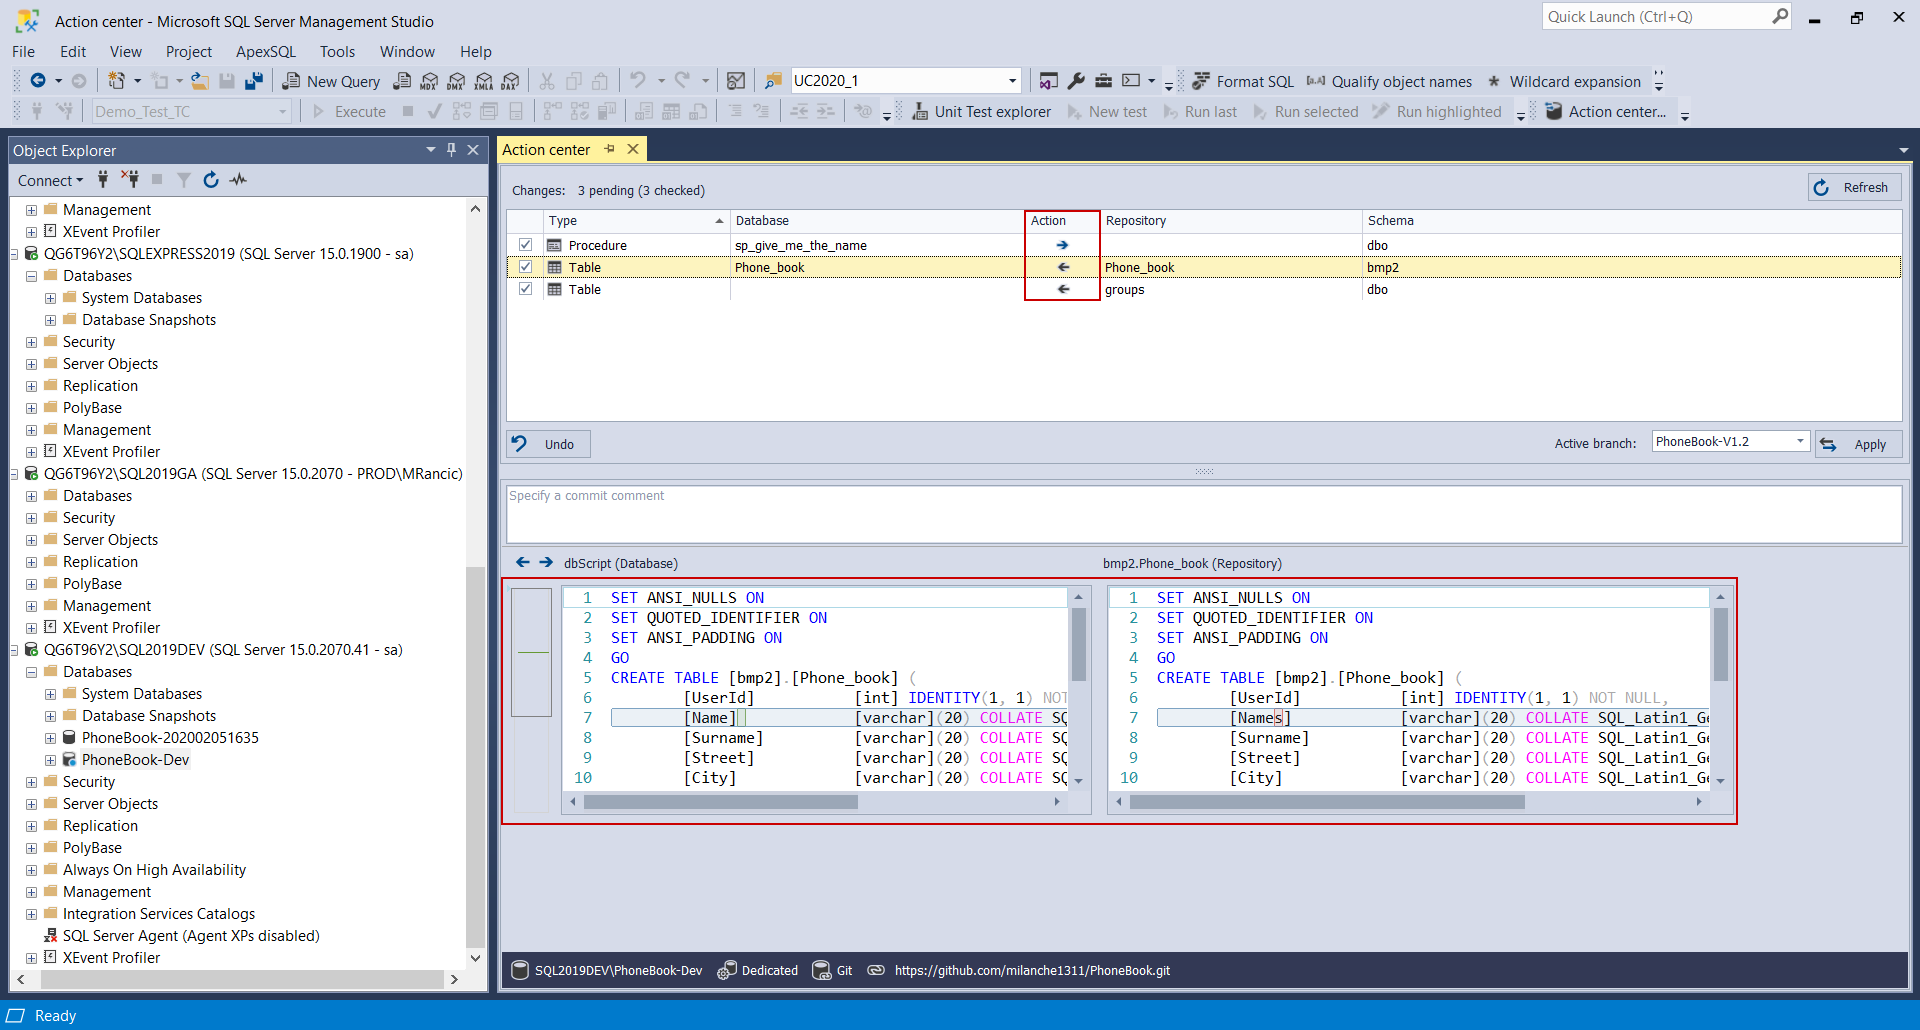
When everything previous is set the remaining operations are to write in the commit comment, click apply and wait for synchronization to complete:
If the baselining is considered complete it is possible to verify this by using a dedicated compare pipeline in Web dashboard. This pipeline should consist of a series of Compare steps. The Compare step has the purpose of comparing data sources and notify if there are discrepancies between them. The steps should be configured to use the production database as one data source and development, staging, QA databases and source control repository as second data source per Compare step:
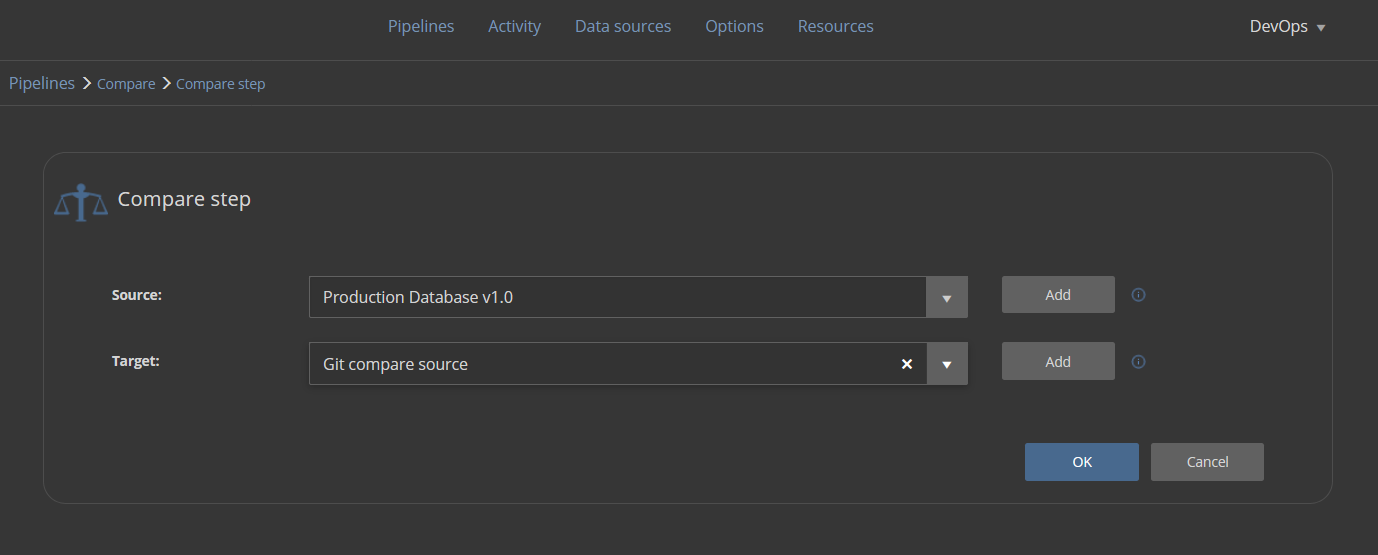
This involves the creation of such data sources in the Data sources section so they can be consumed by the Compare step. The creation of these data sources, with the exception of the development database, will be required in any case because those are essential and will be used for continuous integration and continuous delivery phase of this database lifecycle:

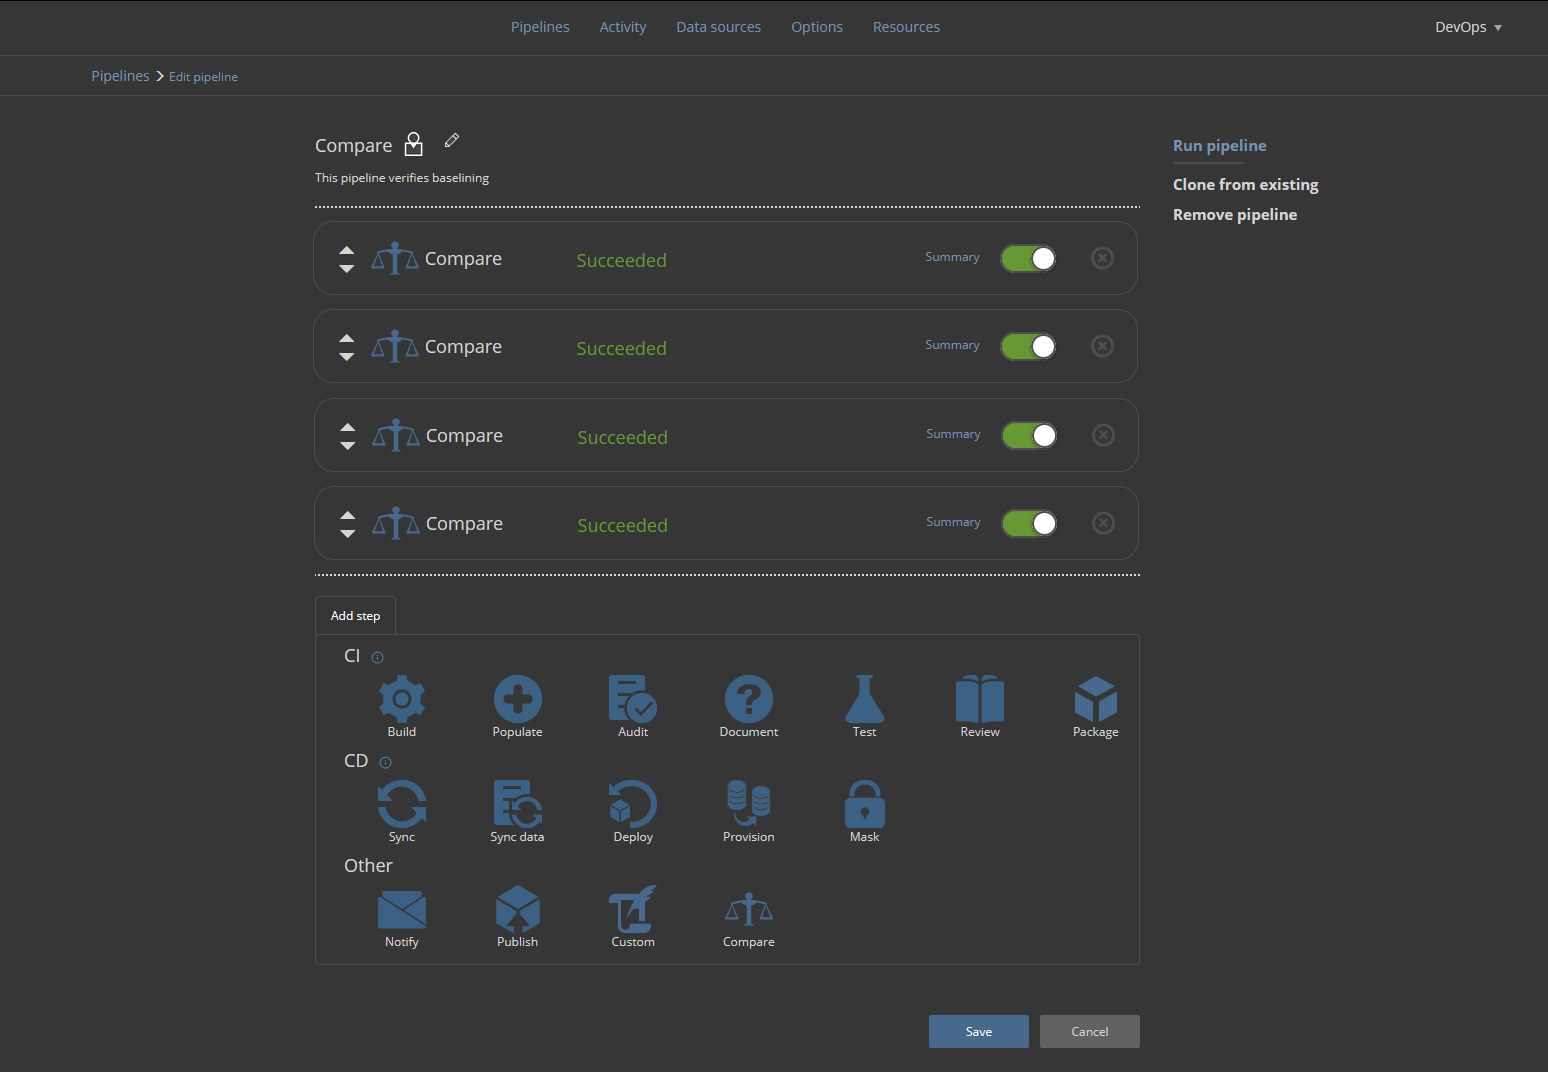
When all necessary Compare steps are placed and configured in this pipeline, the pipeline execution will return success status in case no discrepancies between data sources were found:
Development
For database development and implementation of changes, it would be sufficient to execute all change scripts against the database using standard SQL Server Management Studio environment.
For our new iteration of a database lifecycle, we will first create one new table. Following that one existing stored procedure will be altered to change its behavior and one existing table updated with an additional column:
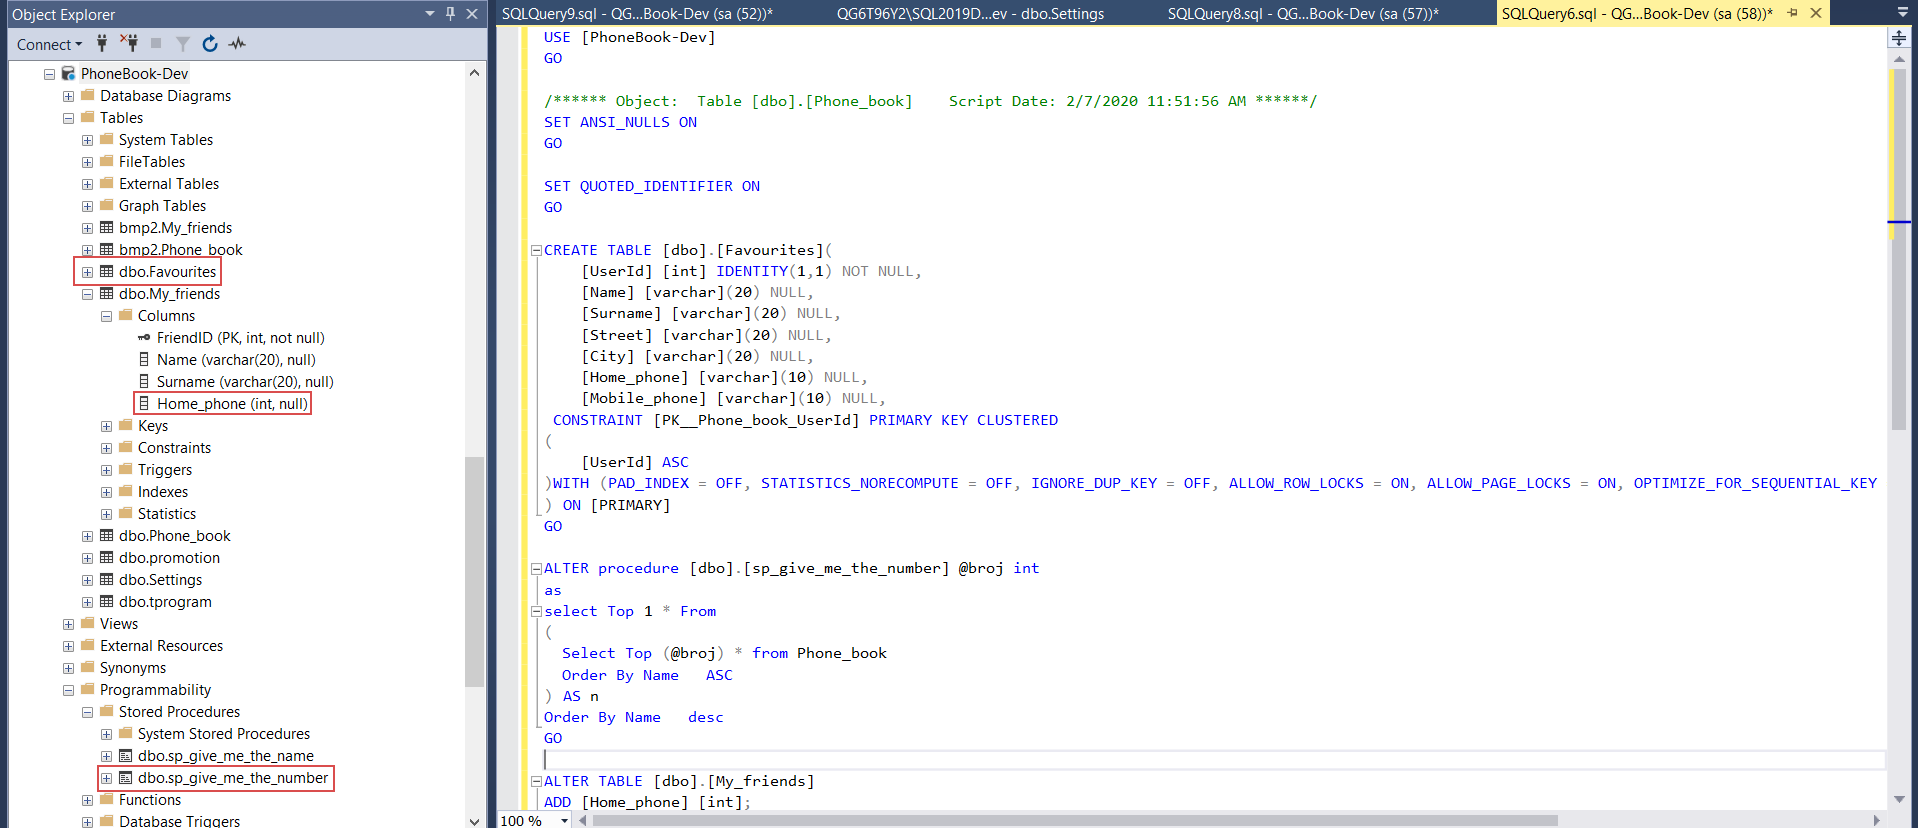
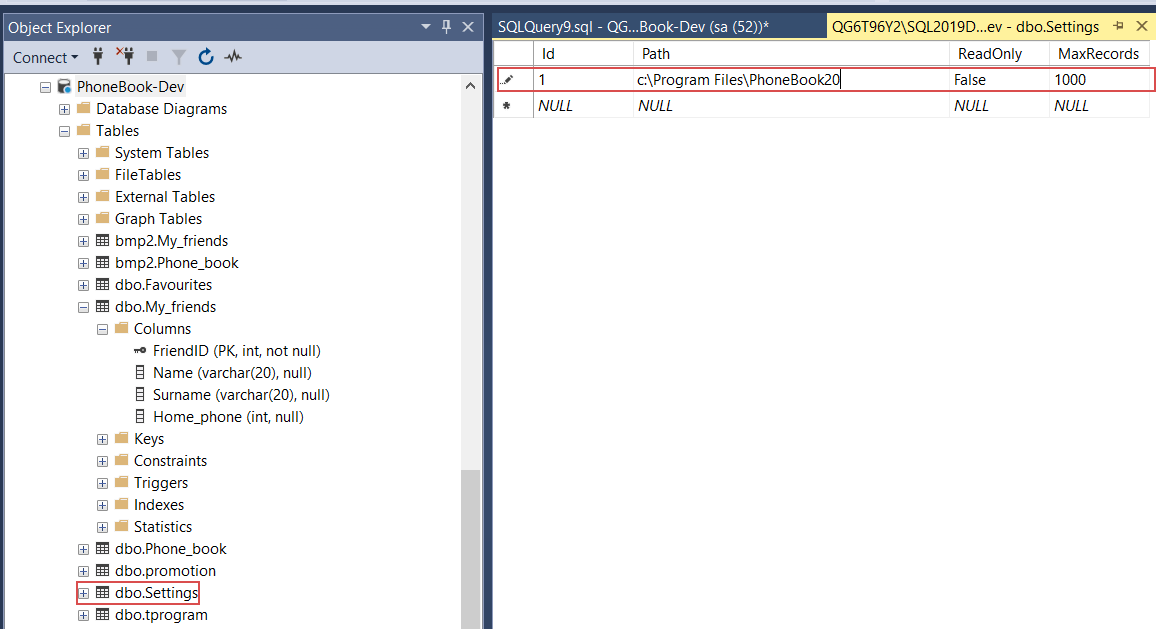
Finally, a simple configuration table in our example database, which contains static data, will have one data field updated:
This is where one additional action is required. In order to be able to commit static data and static data changes to include them in a new database lifecycle iteration, it would also have to be linked to source control along with the table object. To resolve this right-click on the table to show the context menu of Object explorer, then expand the More source control options sub-menu and click the Link static data option:
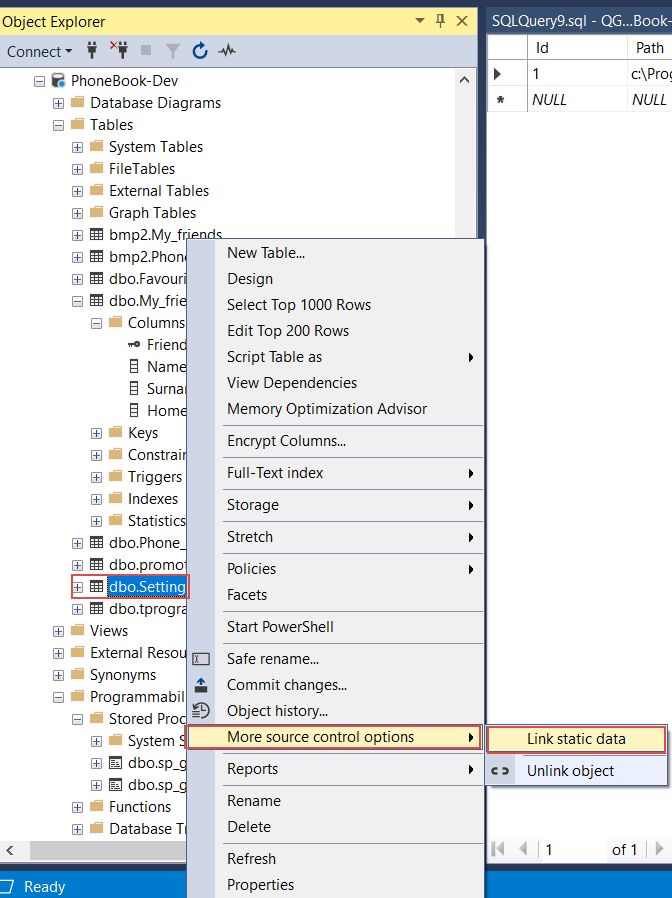
Now the static data can be committed to the source control repository along with the rest of the changes.
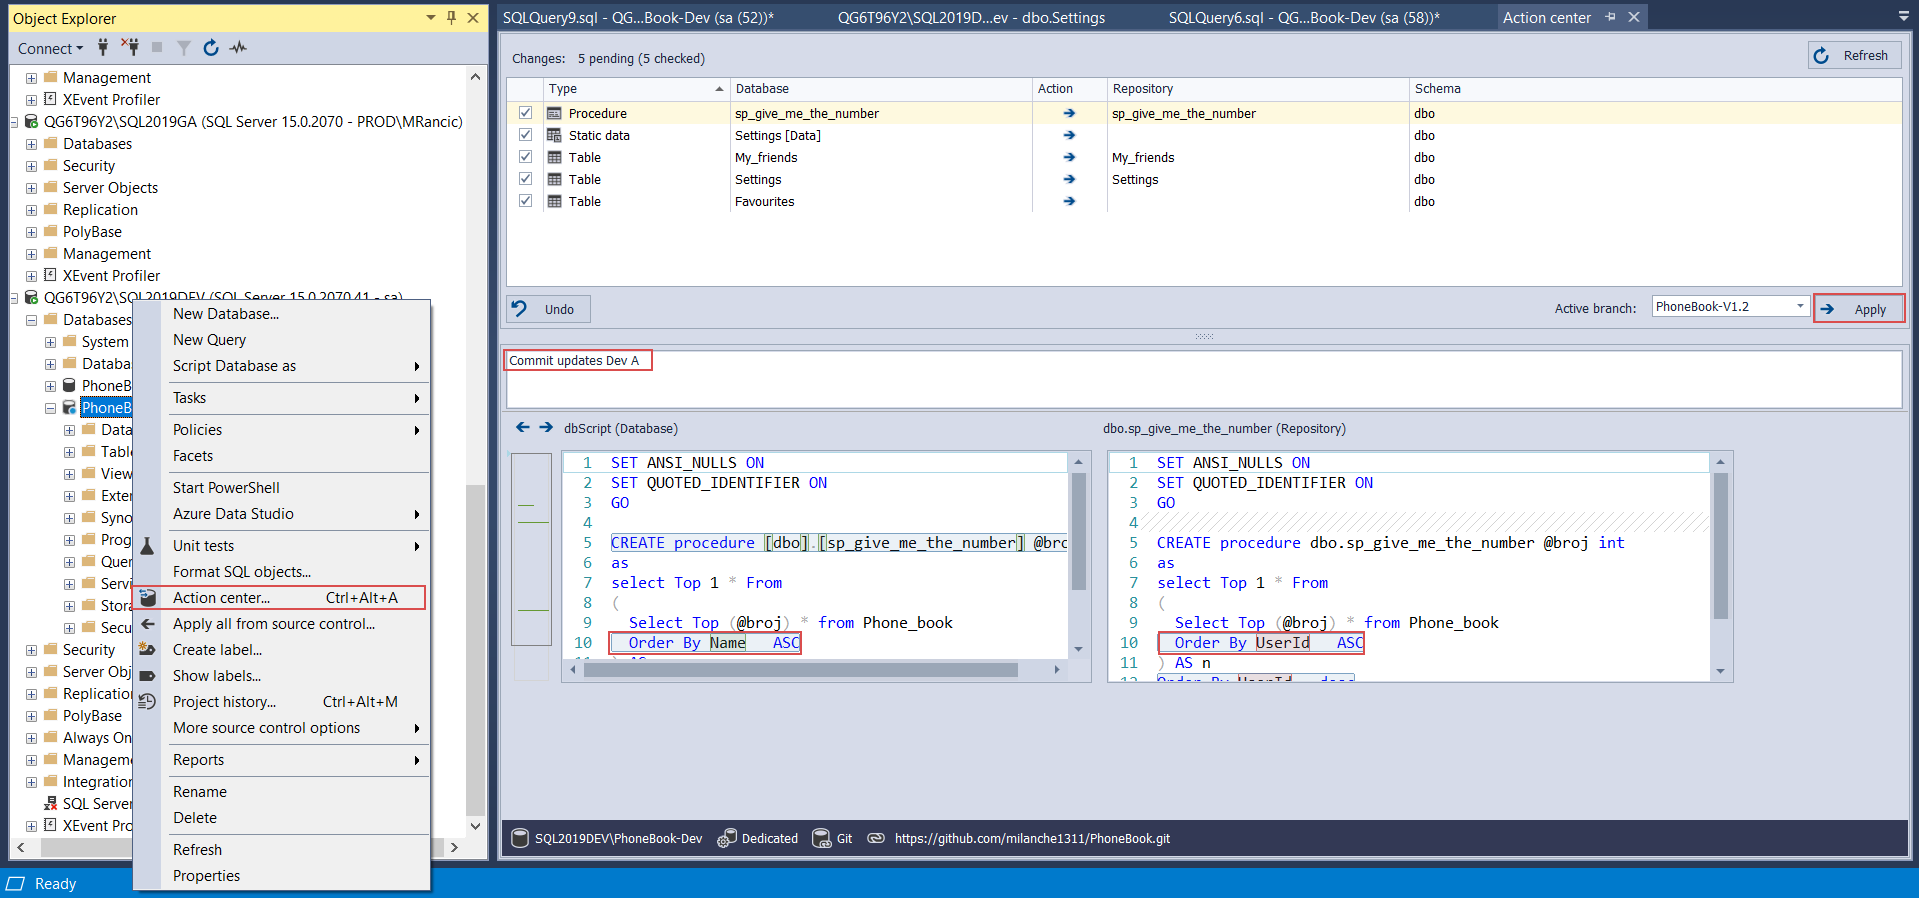
If all required changes are applied, a developer can simply invoke the Action center from the database context menu to commit them to a repository. The Action center will show the list of new and changed objects and changed objects can be reviewed within the Script view section. What is left to do is to enter the commit comment, click the Apply button and wait for the synchronization to finish:
There are cases where database code should be sub versioned. For example, Developer A is working on some objects that belong to one schema and with static data within that scope which should be deployed to one target client, but developer B works on changes within another schema that should be deployed to another client target. All this code goes to one repository and in order to separate we are going to introduce labeling.
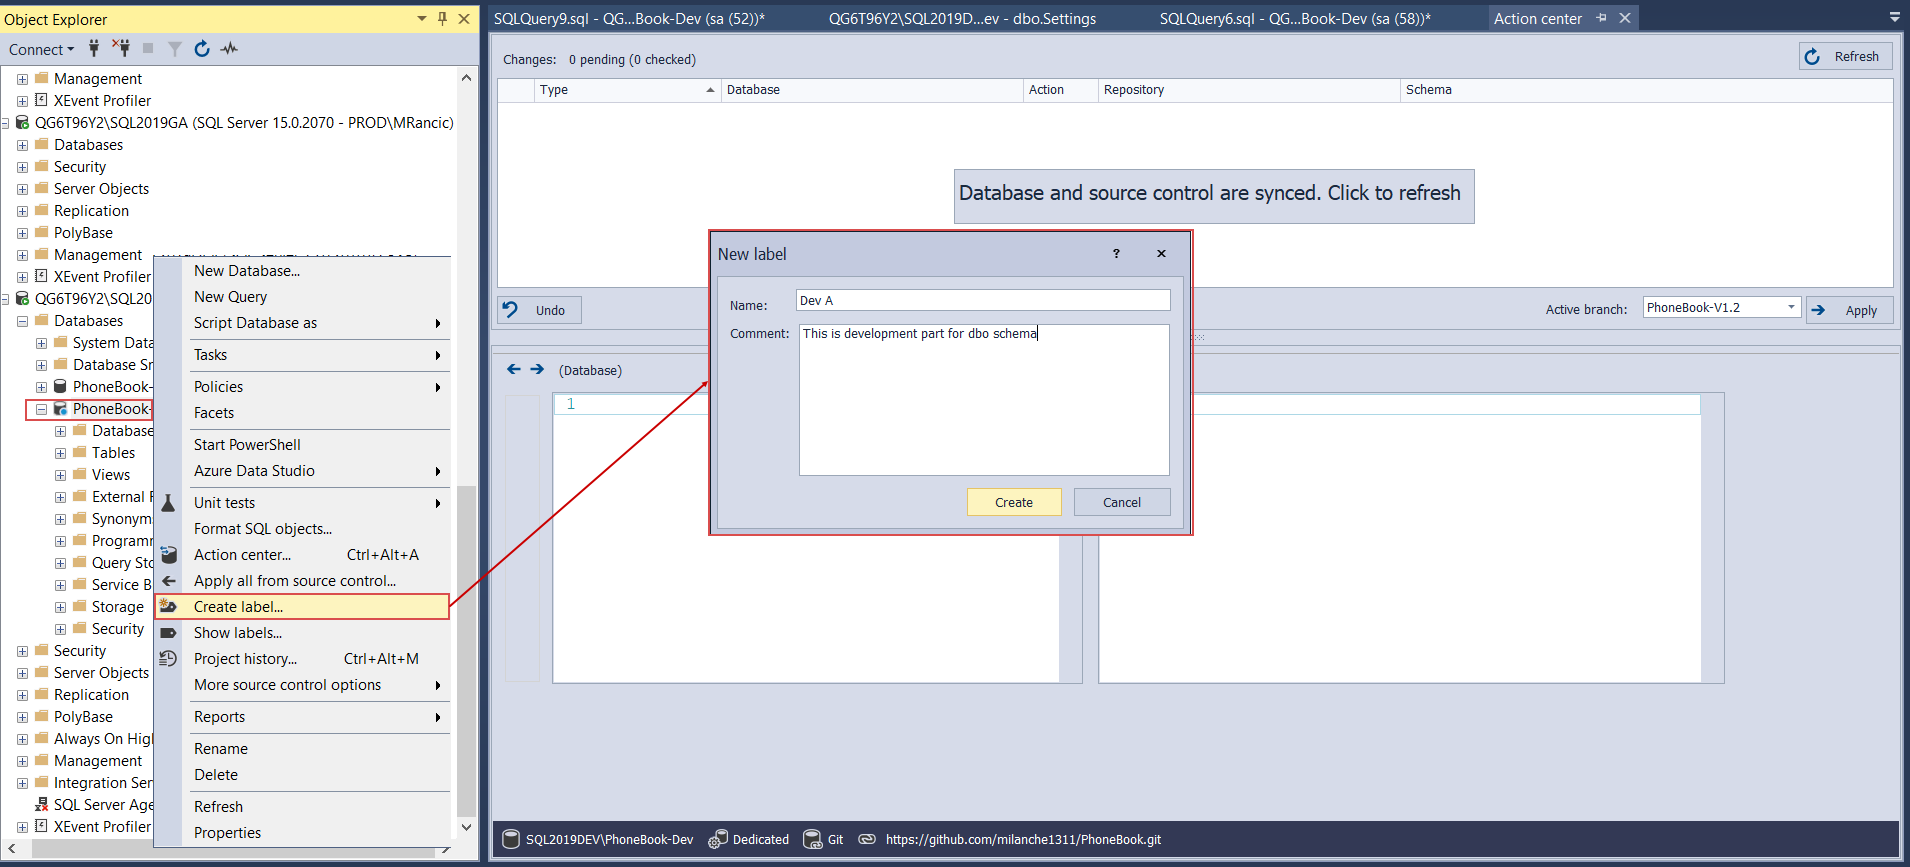
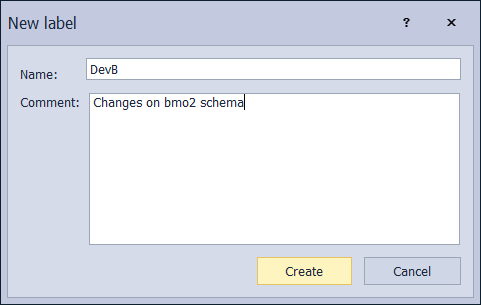
So, developer A finishes with coding and static data changes and commits that work to the repository. With the code sync done, developer A labels this version with, for example, a “DevA” tag. This is done through the Create label option in the context menu of the Object explorer for the linked database:
When developer B finishes with work and needs to commit the code to the repository, the Action center will show the latest version, now seen in the repository as the “DevA” version. From here, it is possible to remove the previous update by directing the previously changed object synchronization from left to right and send a new update:
Now this version will be labeled as “DevB”:
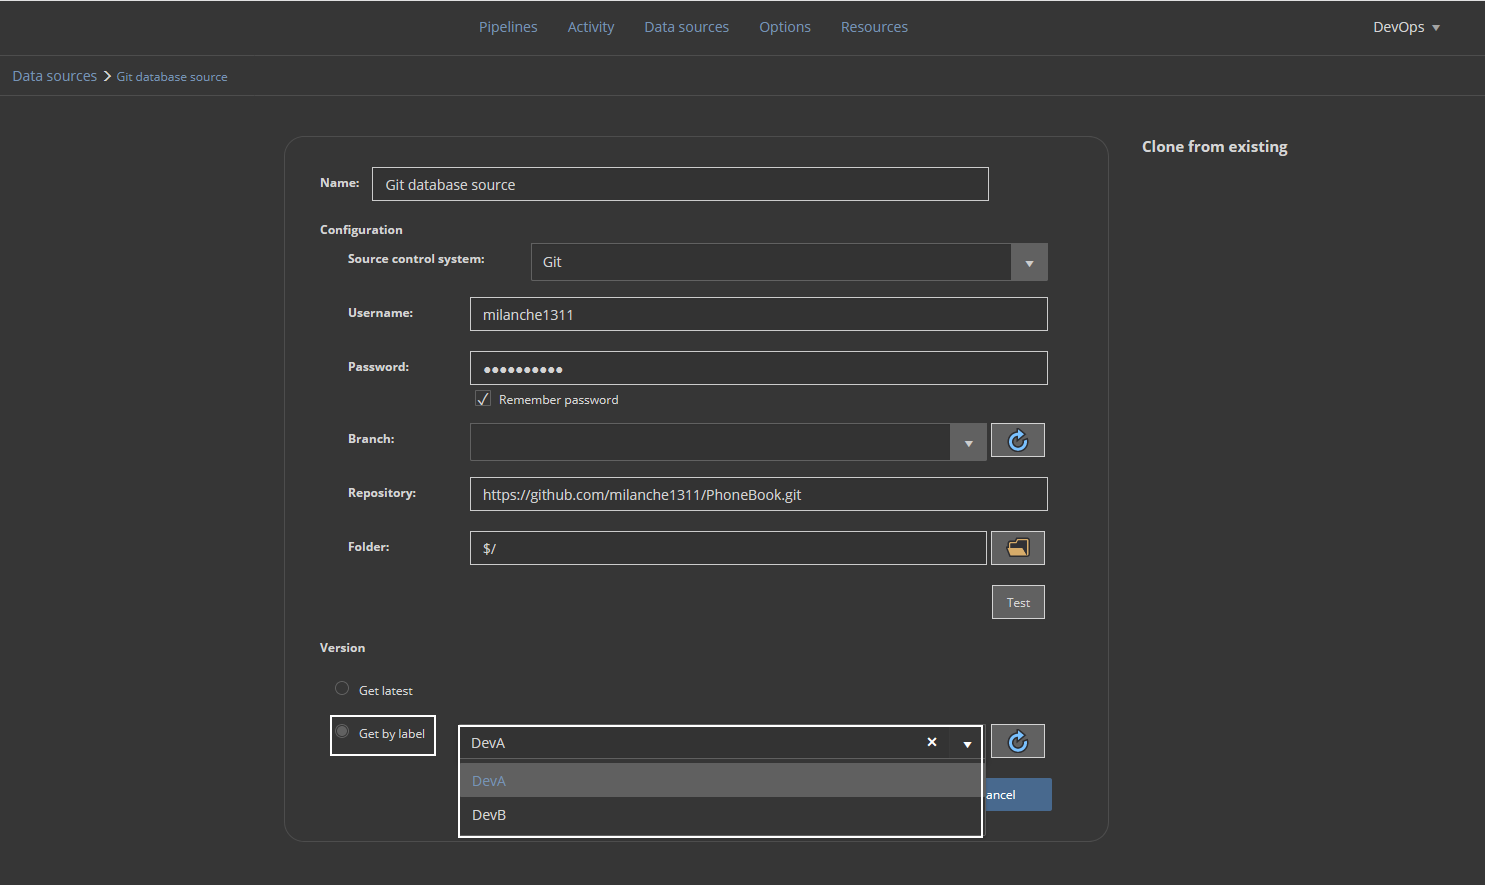
By default, the code version labeled “DevB” will be seen as the latest, but when building a database from this code through continuous integration phase of this database lifecycle iteration, using the ApexSQL DevOps toolkit – Web dashboard, it will be possible to pick the correct version by its label:
Although this example shows that these use cases of a specific database lifecycle iterations are covered by the ApexSQL DevOps toolkit solution it is not a very common use case so we will not consider it further during this walkthrough.
Unit tests
During the development phase, it is possible to create and insert SQL unit tests that can be executed during the continuous integration phase of a database lifecycle.
Unit tests are created and executed with the ApexSQL Unit Test add-in for SQL Server Management Studio. Naturally, this application will also be required on a continuous integration machine when unit tests are executed through an automated pipeline.
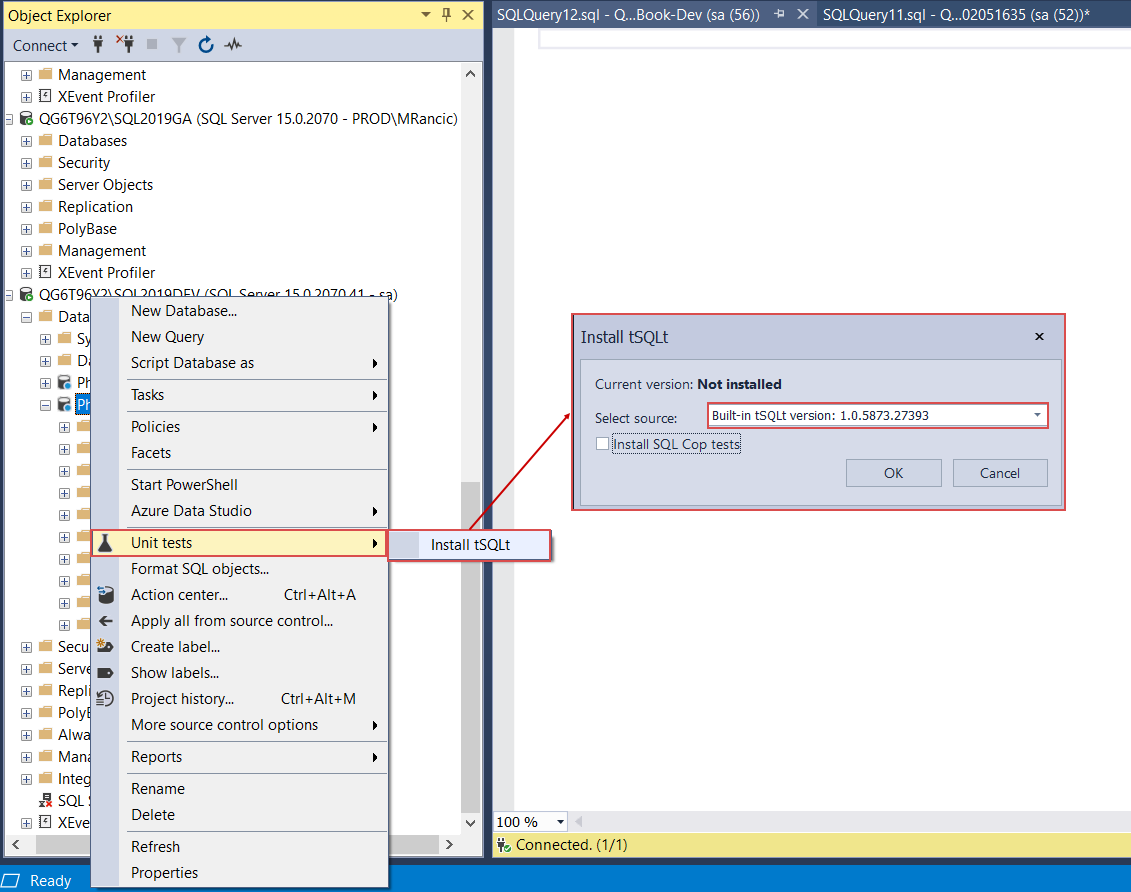
To begin with unit test creation, first, it will be necessary to install the tSQLt framework on the development database. Go to the Unit tests option of the Object Explorer’s context menu and select the Install tSQLt option from the expanded menu. The source should be the built-in version which is selected by default:
Now we can activate the Unit test explorer from the SSMS toolbar which will show the list of databases that have installed tSQLt framework, created test classes and unit tests under those classes. The tSQLt framework can be seen directly it the database as a set of procedures and table objects along with their parenting tSQLt schema:
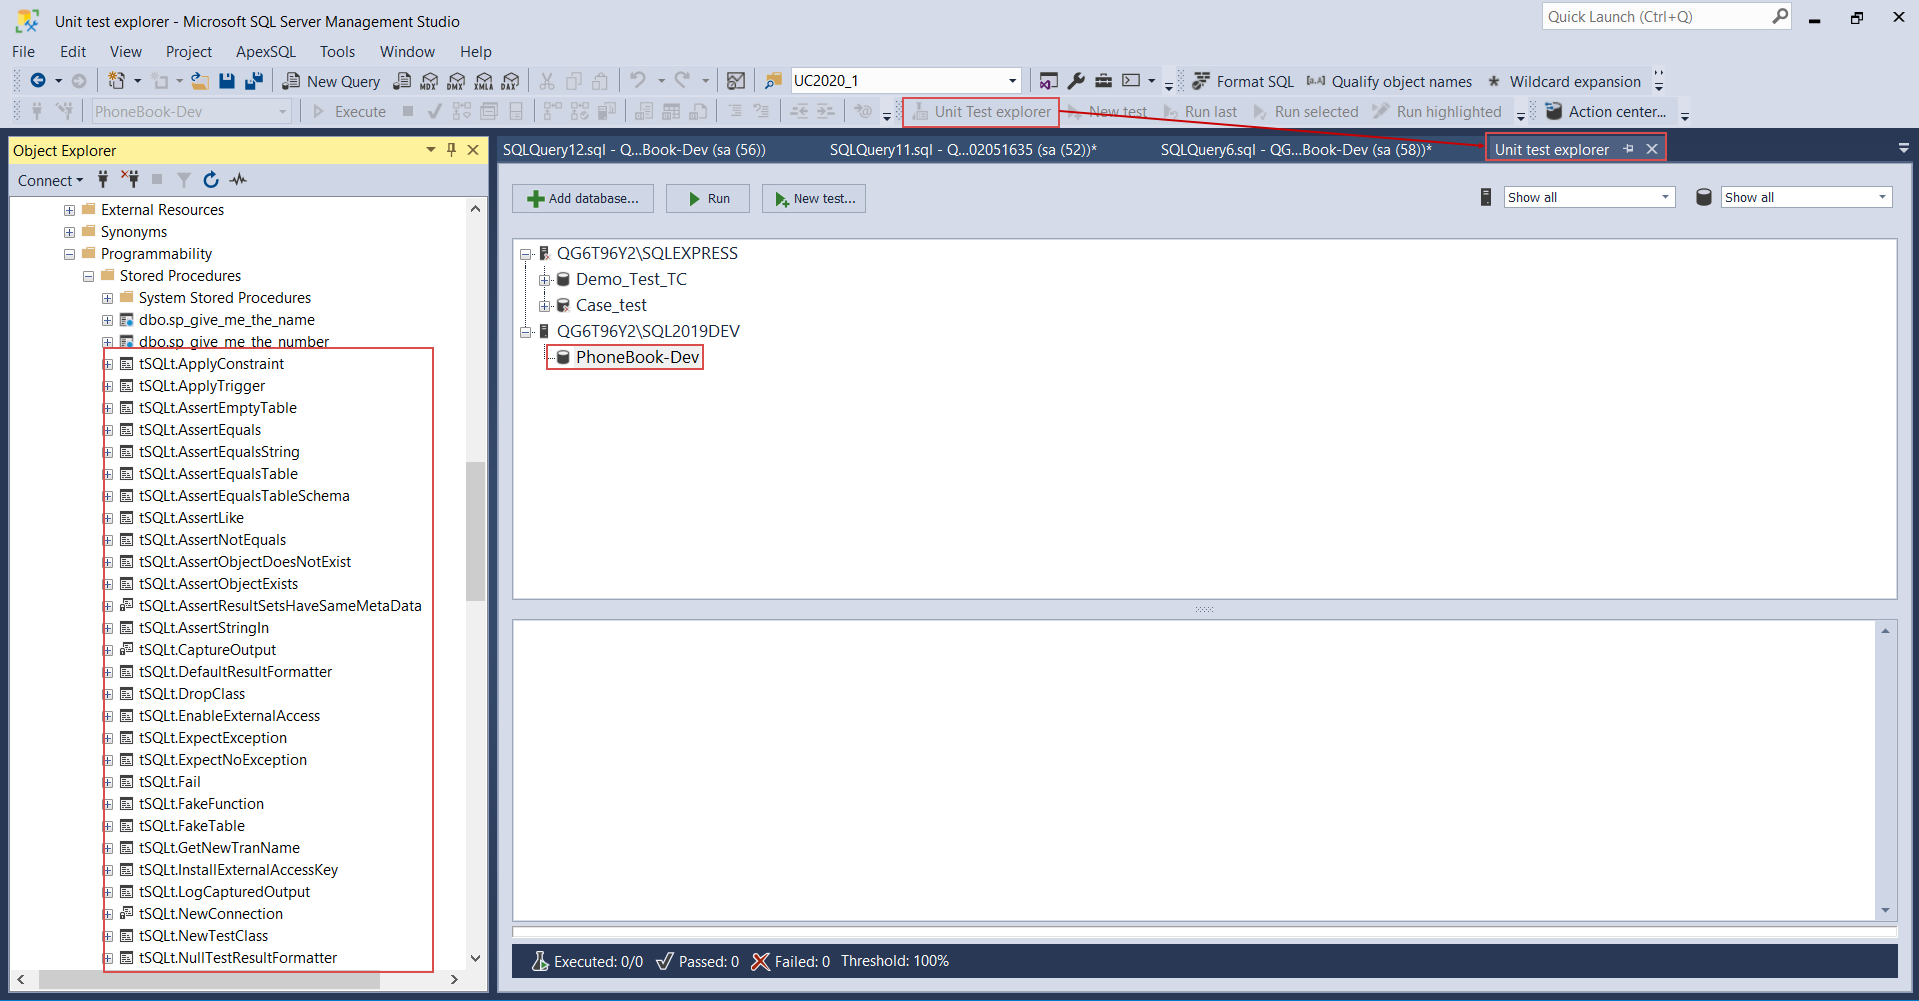
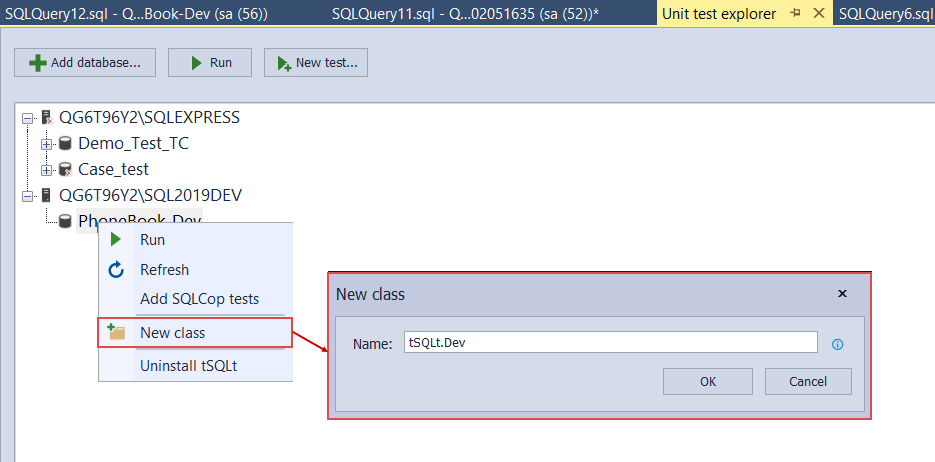
When the framework is installed, it is time to insert a new unit test class. A class is nothing more than a distinction for a group of unit tests and it is represented as parenting schema for included unit tests. This is done through the right-click context menu of the selected database, and click on the option New class.
Here we will create a new class and name it tSQLt.Dev. The tSQLt prefix is not required but will be useful during the continuous integration phase:
Under the created class, we will create a unit test with the New test button and in shown dialogue provide a custom name for the test:
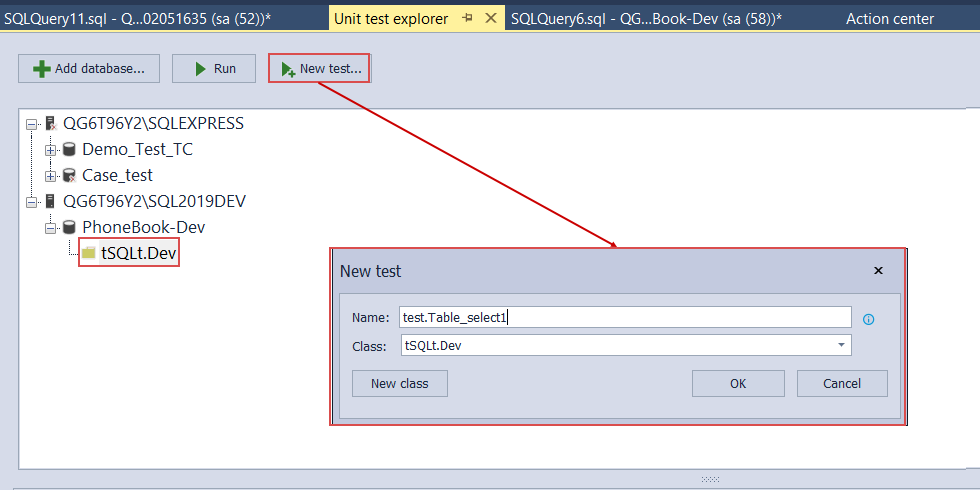
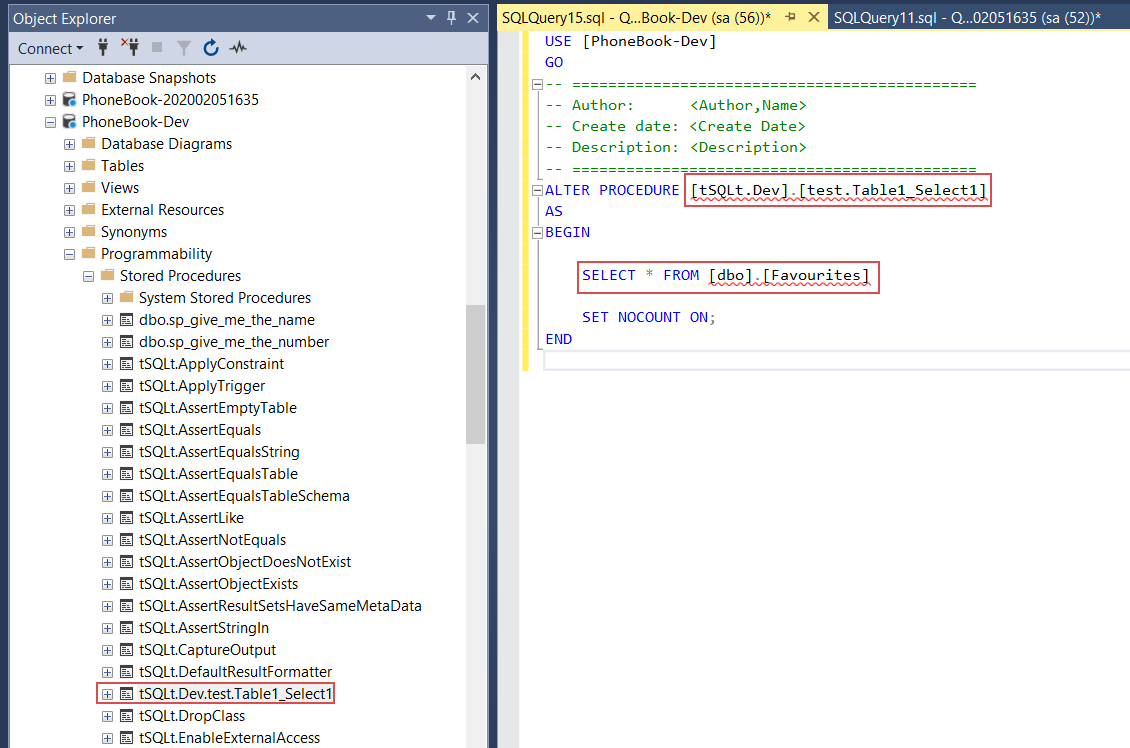
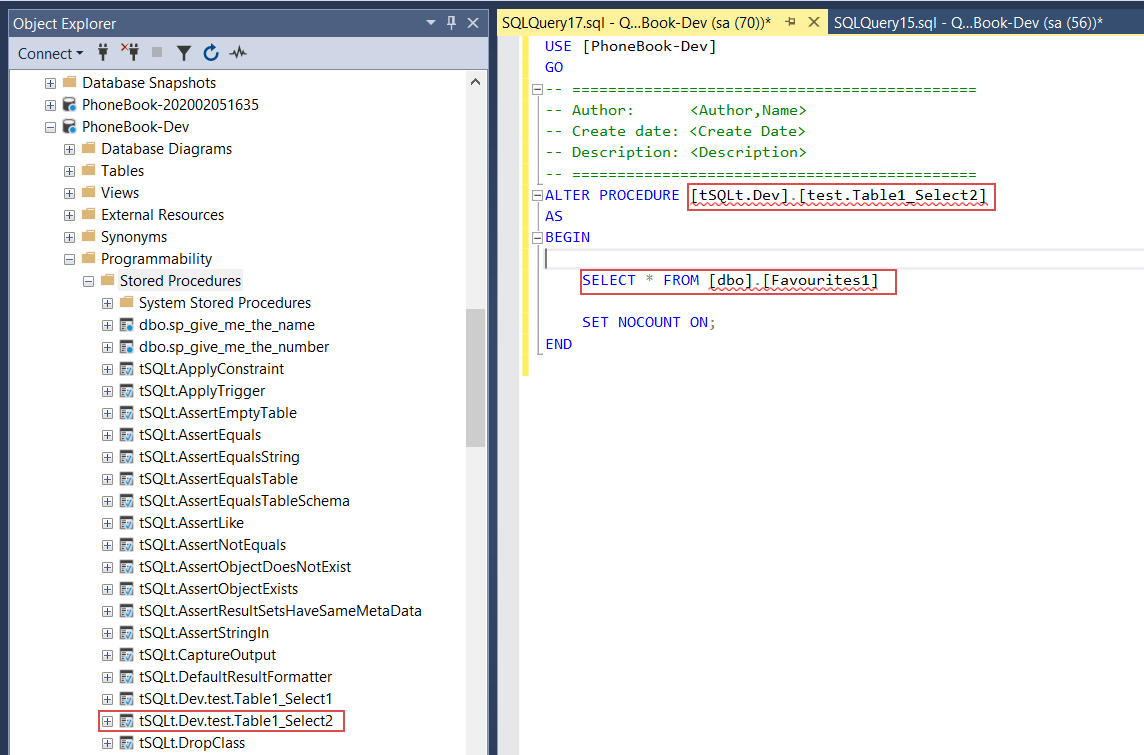
Unit tests are classic stored procedures that are recognized as unit tests by their schema extended property so confirmation on new test creation will create a stored procedure by its given name and open a new query window in SSMS where statements to alter created procedure will be placed. Here is where the procedure body can be defined to work as a unit test. For this example, we’ll create a couple of trivial unit tests, which will contain a simple SELECT statement against the newly created table, just to see them in action. The first test will target the table name correctly:
The second one will target a non-existing table in the same database so we can simulate the error:
Since these tests need to be executed during the automated continuous integration pipeline, they need to be committed to the repository. Open the Action center and select stored procedures that represent created unit tests and their schema and commit them to the repository with the rest of the changes:
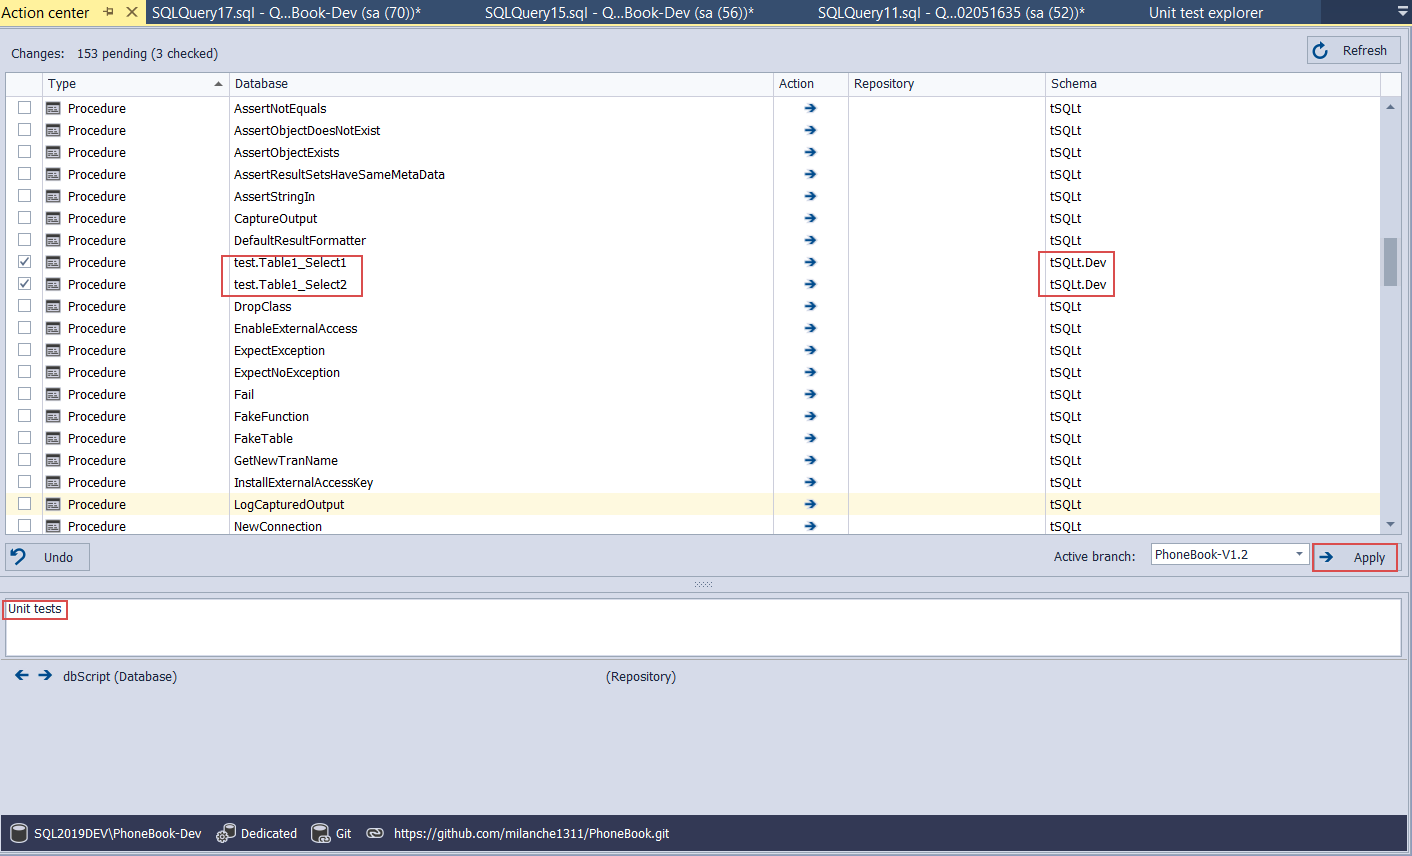
For the remaining bunch of tSQLt objects, it is not necessary to commit them to the source control repository as they are going to be installed automatically on the test built database, in a fully configured continuous integration pipeline.
Conclusion
With all updates and unit tests now present in source control we can conclude the development part of this tutorial and in the next part, we will present continuous integration and testing part of this database lifecycle iteration using updated source code as the data source.
Thanks for watching! For more information, please visit apexsql.com


