


This video shows how to start using ApexSQL Unit Test. After installing and integrating with SQL Server Management Studio, a sample database and a Demo Kit options allow the user to try out the add-in on pre-defined databases and with a set of pre-defined unit tests. This will give an overview of the main features including the installation of the tSQLt framework and running unit tests. Once the main features are reviewed, the user can add a database in the Unit test explorer tab, by installing the tSQLt framework as well as adding a set of sample unit tests. New unit tests and test classes can be added and executed at any point, while the execution results can be exported to various output formats and in a database table.
Transcript
Hello and welcome to this ApexSQL Unit Test general overview video. ApexSQL Unit Test is a SQL Server Management Studio add-in used to manage SQL database unit tests. Besides the set of pre-defined tests and a Demo kit that includes a sample database and a set of sample unit tests, ApexSQL Unit Test can be used to create, maintain and run unit tests against any database, and even run tests on multiple databases on the same SQL Server as well as on multiple SQL Server instances at the same time.
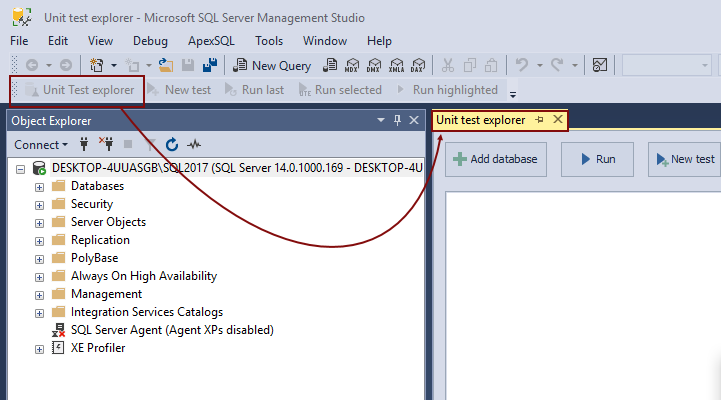
Once ApexSQL Unit Test is installed and integrated into SQL Server Management Studio, let’s initiate the Unit Test explorer tab, which is the main communication channel between the add-in and databases that contain unit tests. We’ll do that either by clicking on the Unit Test explorer command from the add-in toolbar or by using a keyboard shortcut:
By default, the Demo kit dialog appears offering the user to install Sample database and Demo kit:
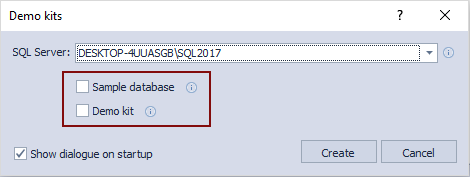
Let’s check both options and click the Create button:
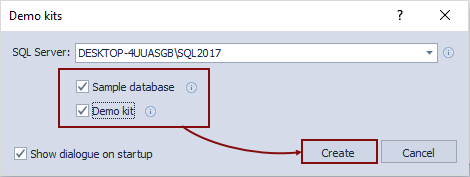
This will create two databases tSQLt Example and PUBS QA. Both databases will have a tSQLt framework already installed and a set of pre-defined unit tests.
Before moving forward with the Demo kit, let’s explain the structure in the Unit Test explorer tab. It is organized in such a way that each SQL Server instance is a top node. When expanding a SQL Server node, all databases that contain the tSQLt framework will be shown. Expanding any database shows test classes in which SQL unit tests are grouped. And finally, expanding each test class shows all underlying unit tests:
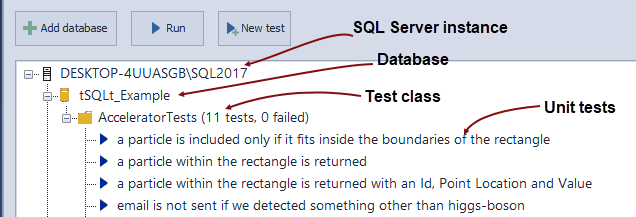
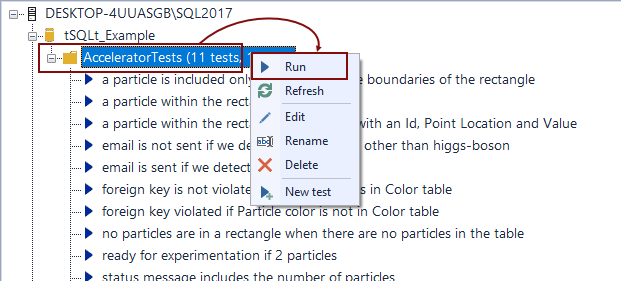
Now, we can easily determine what is what in the Unit Test explorer tab. We can confirm that for the tSQLt Example database there are 11 unit tests, all within a single test class called Accelerator Tests.
To run any unit test, we can simply right click on it, and select the Run option from the context menu:
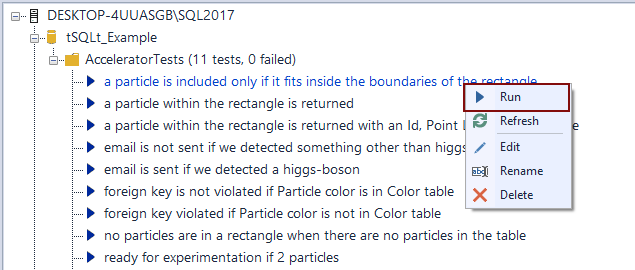
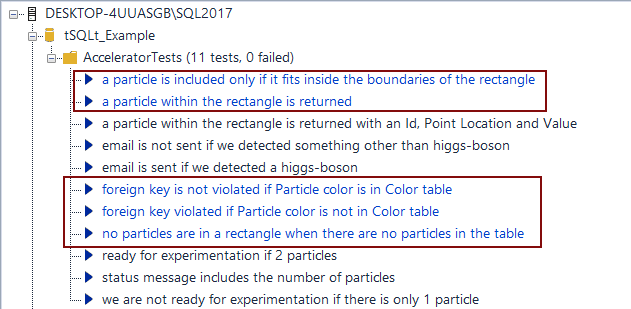
Note that the unit test name will invert its color on a right click. This indicates that it is selected for execution. In order to run multiple tests from the same class, left click the ones that will be executed and use the right click to initiate the execution process:
The same can be achieved using the Run button above:
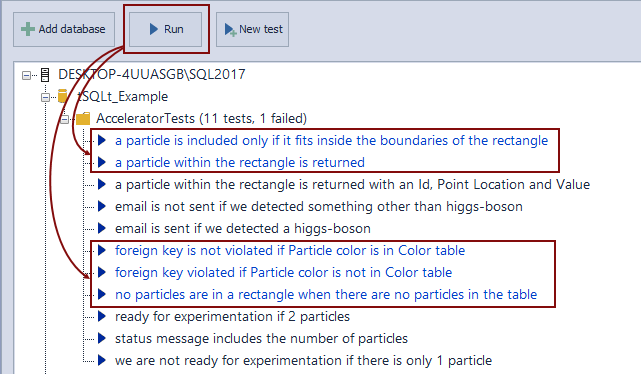
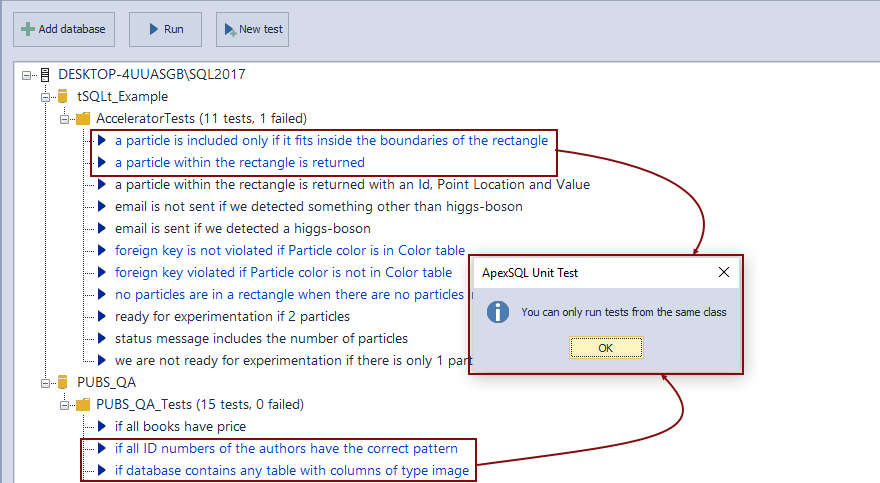
Running tests from different classes is not allowed, no matter if it is within the same database or SQL Server instance or not. In the case where at least one test from another class is selected, the add-in displays a message that multiple tests can be executed only if they belong to the same class:
Similar to running one or more tests within a single class, each node in the Unit Test explorer tab has its own Run command. Initiating the Run command on the particular node will execute all underlying tests:
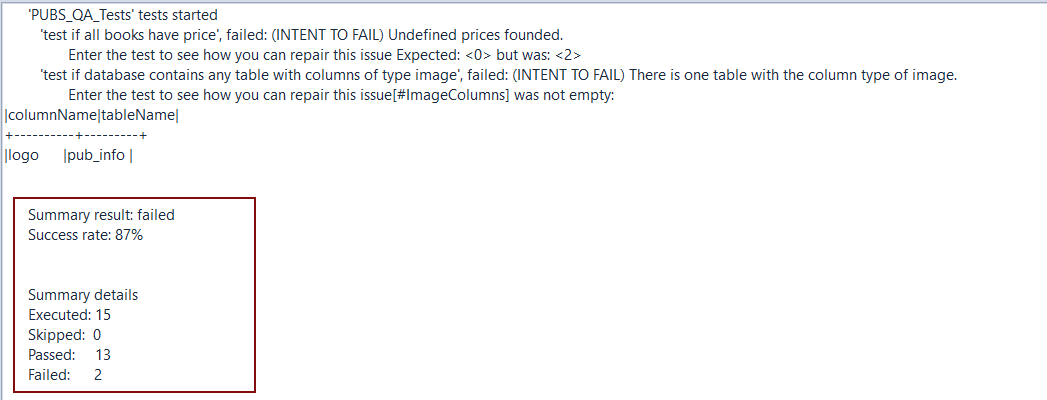
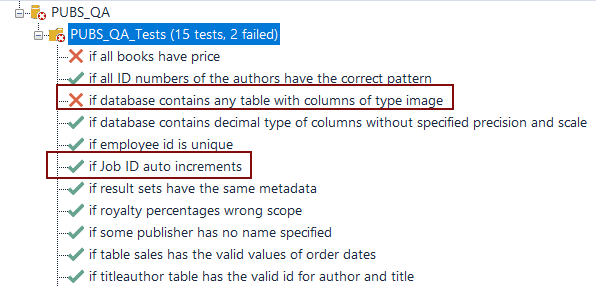
Once a unit test or a group of unit tests are executed, the Results section at the bottom of the Unit Test Explorer tab shows the test summary and messages related to unit tests that did not pass. For instance, if we execute all unit tests for the Pubs QA database, the Results section shows 87% of tests passed, while 13% failed. Since the Pubs QA database has 15 unit tests specified, that would be 13 passed tests and 2 failed. This information will be displayed in the Results section:
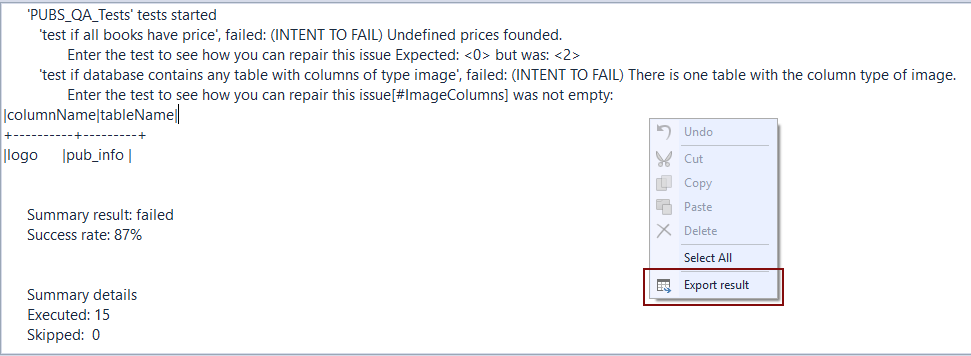
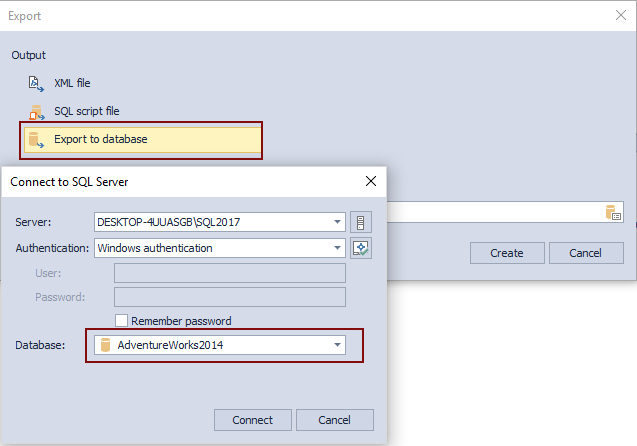
Execution results can be exported to an XML document, SQL script, or even in a database.
Above the summary, the appropriate messages will be shown for unit tests that failed. These are the messages that a developer will specify in the unit test itself, to be shown in the case test fails.
As soon as unit tests are executed at least once, each test will have the appropriate icon, so the user can easily verify if it failed or passed:
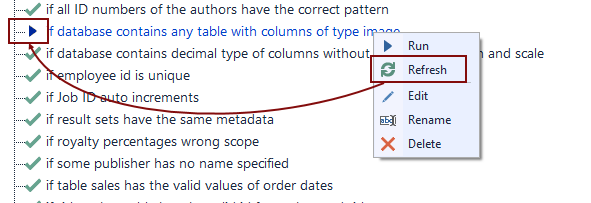
Similar to the Run command on each node, the Refresh command will reset this status to the initial state for the selected node, by right clicking it and choosing the Refresh command from the context menu:
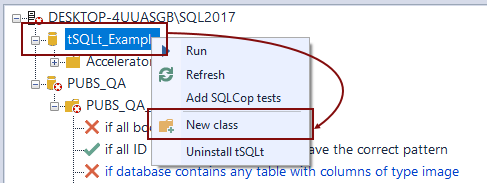
Besides the set of pre-defined tests, new test classes and tests can be added for any database. In order to create a new test class, we’ll need to right-click a database in the Unit Test explorer tab, and choose the New class option from the context menu:
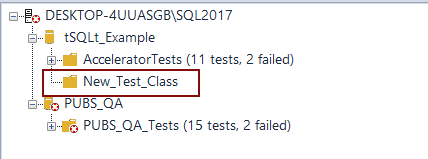
After specifying a name for a new class, it appears in the Unit Test explorer tab for the selected database:
Now that we have a new class we can add new unit tests. In order to do so, we’ll right-click a newly created class and choose the New test command from the context menu:
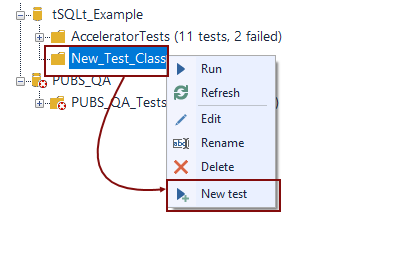
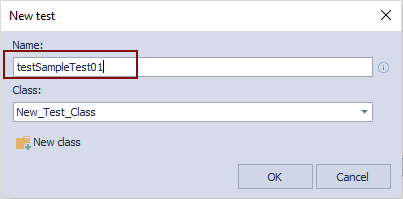
This initiates the New test dialog, where the test class will be set to already point to the newly created class. We’ll specify a name for the new test. Note that the ‘test’ prefix is mandatory for all the tests:
Once we click the OK button, a new query opens with a unit test template script:
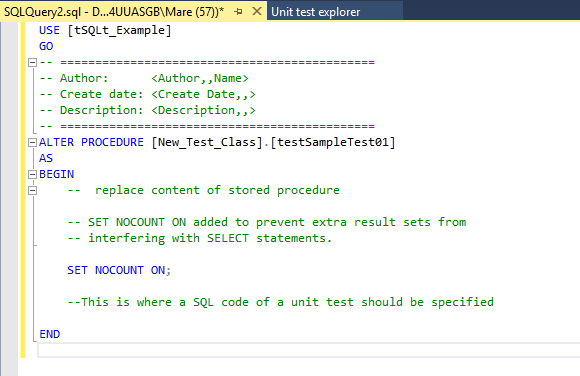
Since each unit test is a SQL stored procedure, it is important to mention that a unit test must be created using ApexSQL Unit Test and the described workflow. SQL stored procedures created outside ApexSQL Unit Test will not be recognized as unit tests. Let’s see how to add an existing database in the Unit test Explorer tab.
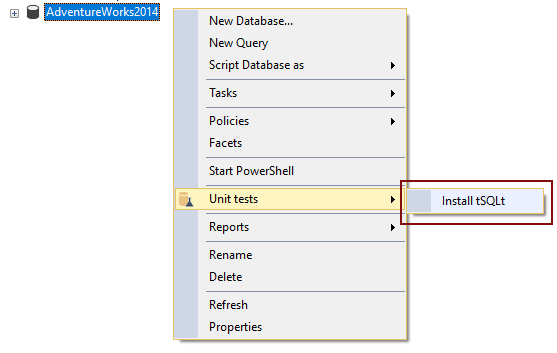
In order for a database to be added in the Unit Test explorer tab, it must have the tSQLt framework installed. We’ll use Adventure Works database, for the purpose of this video. If a database does not have the tSQLt framework installed, the context menu in the Object Explorer pane will have only one option and that is to install the tSQLt framework:
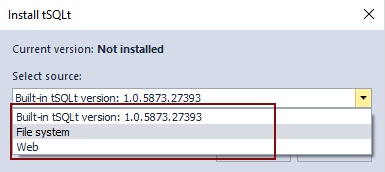
When installing the tSQLt framework, the user can choose to install the integrated version, to browse the file system to determine if the specific version was previously downloaded, or to pick a specific version directly from the web:
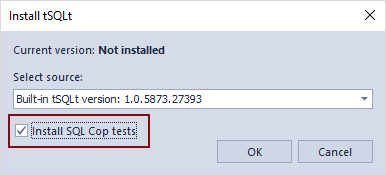
Since, in our case, the integrated version is the most recent one, we’ll choose the first option. In addition to this, we don’t want to go into details with writing new unit tests from scratch. For that reason, we’ll check the Install SQLCop tests option. This will install a set of pre-defined tests:
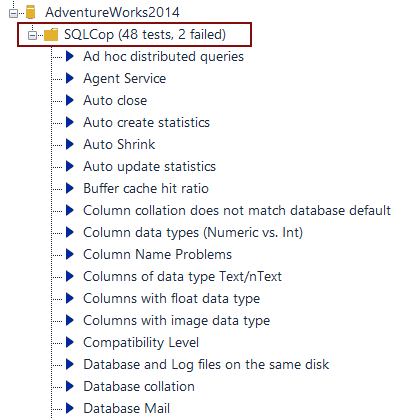
As a result, we’ll have the Adventure Works database added to the Unit Test explorer tab as well as a set of SQLCop unit tests created:
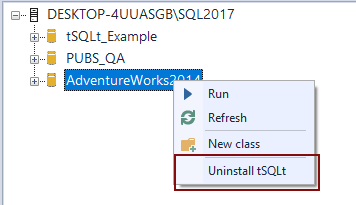
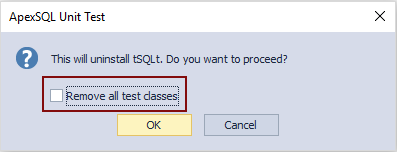
In order to remove a database from the Unit Test explorer tab, right click the specific database and choose the Uninstall tSQLt option:

If a database needs to be temporarily removed from the Unit Test explorer tab and if the existing unit tests will be used again, we can leave the Remove all test classes option unchecked. This will uninstall the tSQLt framework from the selected database and, in turn, remove it from the Unit Test explorer tab. The unit tests will remain in a database though:
Thanks for watching. For more information please visit apexsql.com


