


This video shows steps for making the pipelines using ApexSQL DevOps toolkit Web Dashboard. The ApexSQL DevOps toolkit Web Dashboard enables users to create flexible CI and CD pipelines with highly customizable pipeline steps. These steps include: Build, Populate, Audit, Document, Test, Review, Package, Schema sync, Data sync, Deploy, Notify and Publish.
Transcript
Hello, and welcome to this ApexSQL DevOps toolkit Web Dashboard DEMO introduction. The ApexSQL DevOps toolkit Web Dashboard is a customizable build agent with Web based user interface used for creating and executing continuous integration and delivery pipelines.
The ApexSQL DevOps toolkit Web Dashboard enables users to create flexible CI and CD pipelines with highly customizable pipeline steps. The Dashboard utilizes the ApexSQL DevOps toolkit PowerShell code, via a Web based user interface and provides an easy method for database developers to build, review, document and deploy changes for SQL Server projects with full customization.
For the creation of customized CI and CD workflows using the Web dashboard there is a selection of steps displayed in the Pipeline configuration view. Steps are represented as interactive icons within this view and grouped based on their common usage.
The first group of steps are used for creation of CI pipelines.
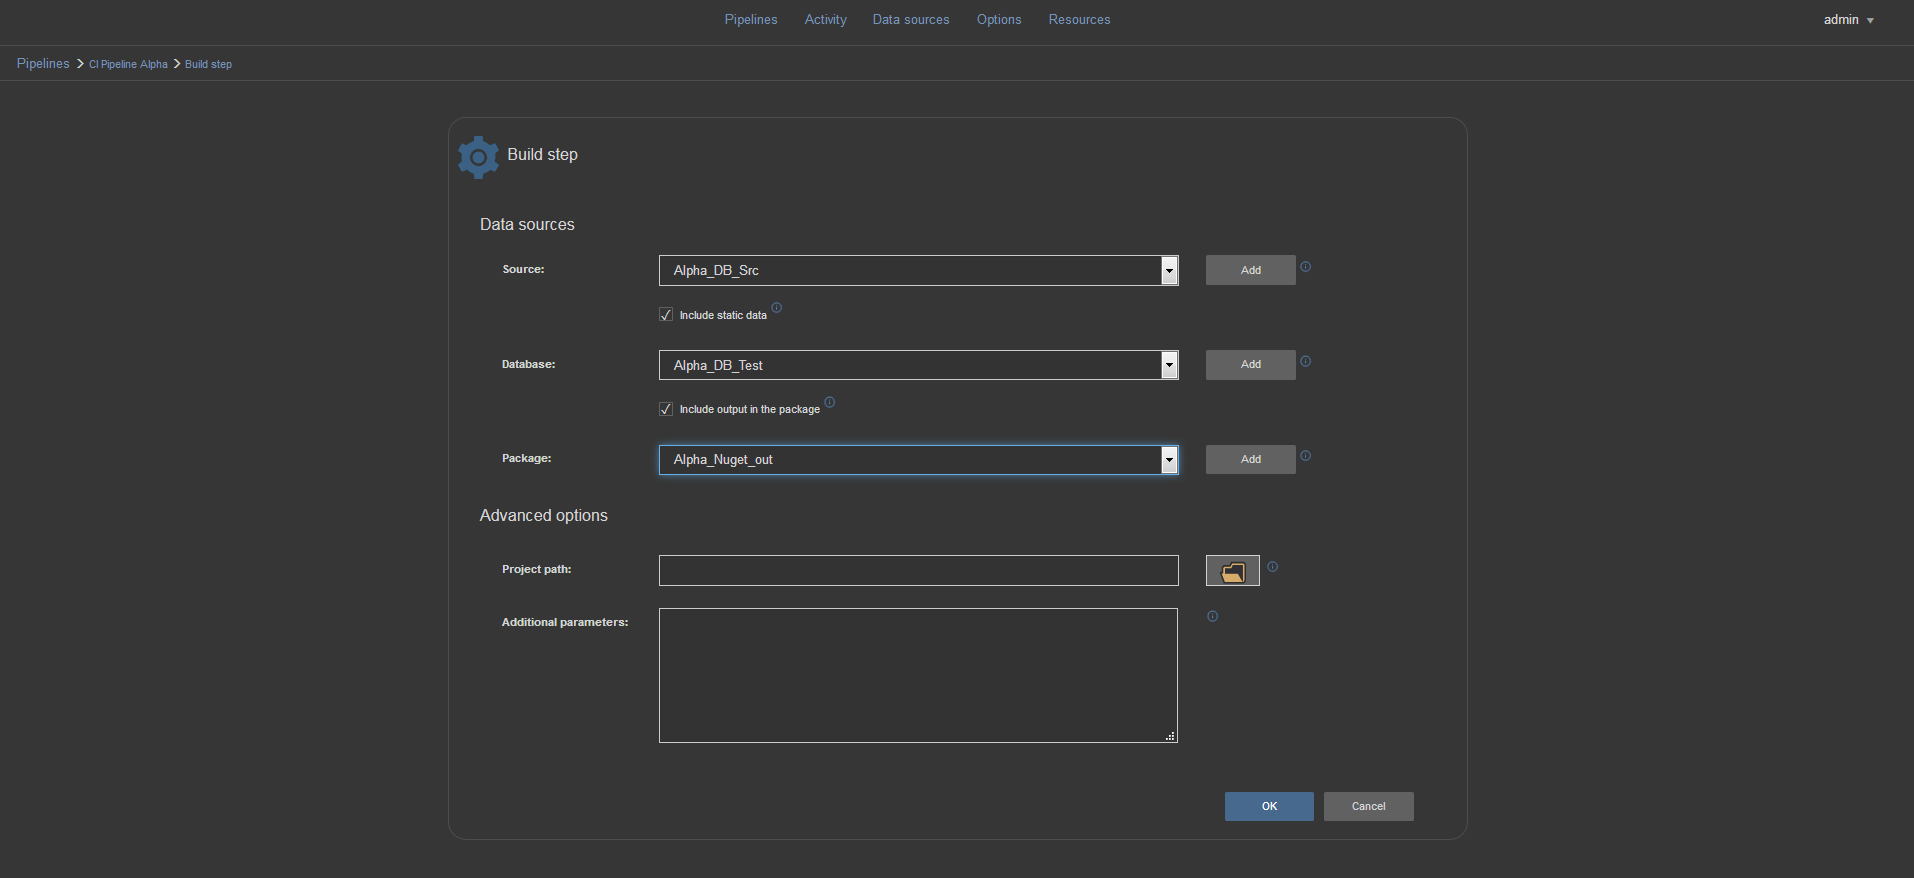
The BUILD step is the first in line and used to build a new database for testing with committed changes, including both schemas and static data, from a source control repository.
To configure the BUILD step, use the Source dropdown menu and choose a Data source that has previously been created as Source control data source configured to use the desired repository.
In the Database selection menu pick a destination database where the test database will be built from source control.
Alternatively, if the Data source was not previously created, use the Add option to switch to New data source view then configure the data source and with its creation it will immediately be available to use within the step configuration.
If the repository contains scripted static data that needs to be included in the test database use the option Include static data.
The expected output with the execution of this step will be a SQL build script. It can be optionally included in a NuGet package. To package the script in this way, check the Include output in the package option and pick the previously created NuGet type Data source from the dropdown selection menu. The output build script can be reviewed and reused later from this package.
Include a project file in project path field to import a set of options from a previously created project file created with the ApexSQL Build application. Set additional parameters if needed, to override existing automation options or append with additional options.
For example, some of the default options for the build step are output destination as a database, with full recovery mode and without author label. Adding the set of switches db_recovery, output_type and author, it is possible to change output to be an executable installer that can be executed against a SQL Server later for the build with simple recovery mode and the author name label.
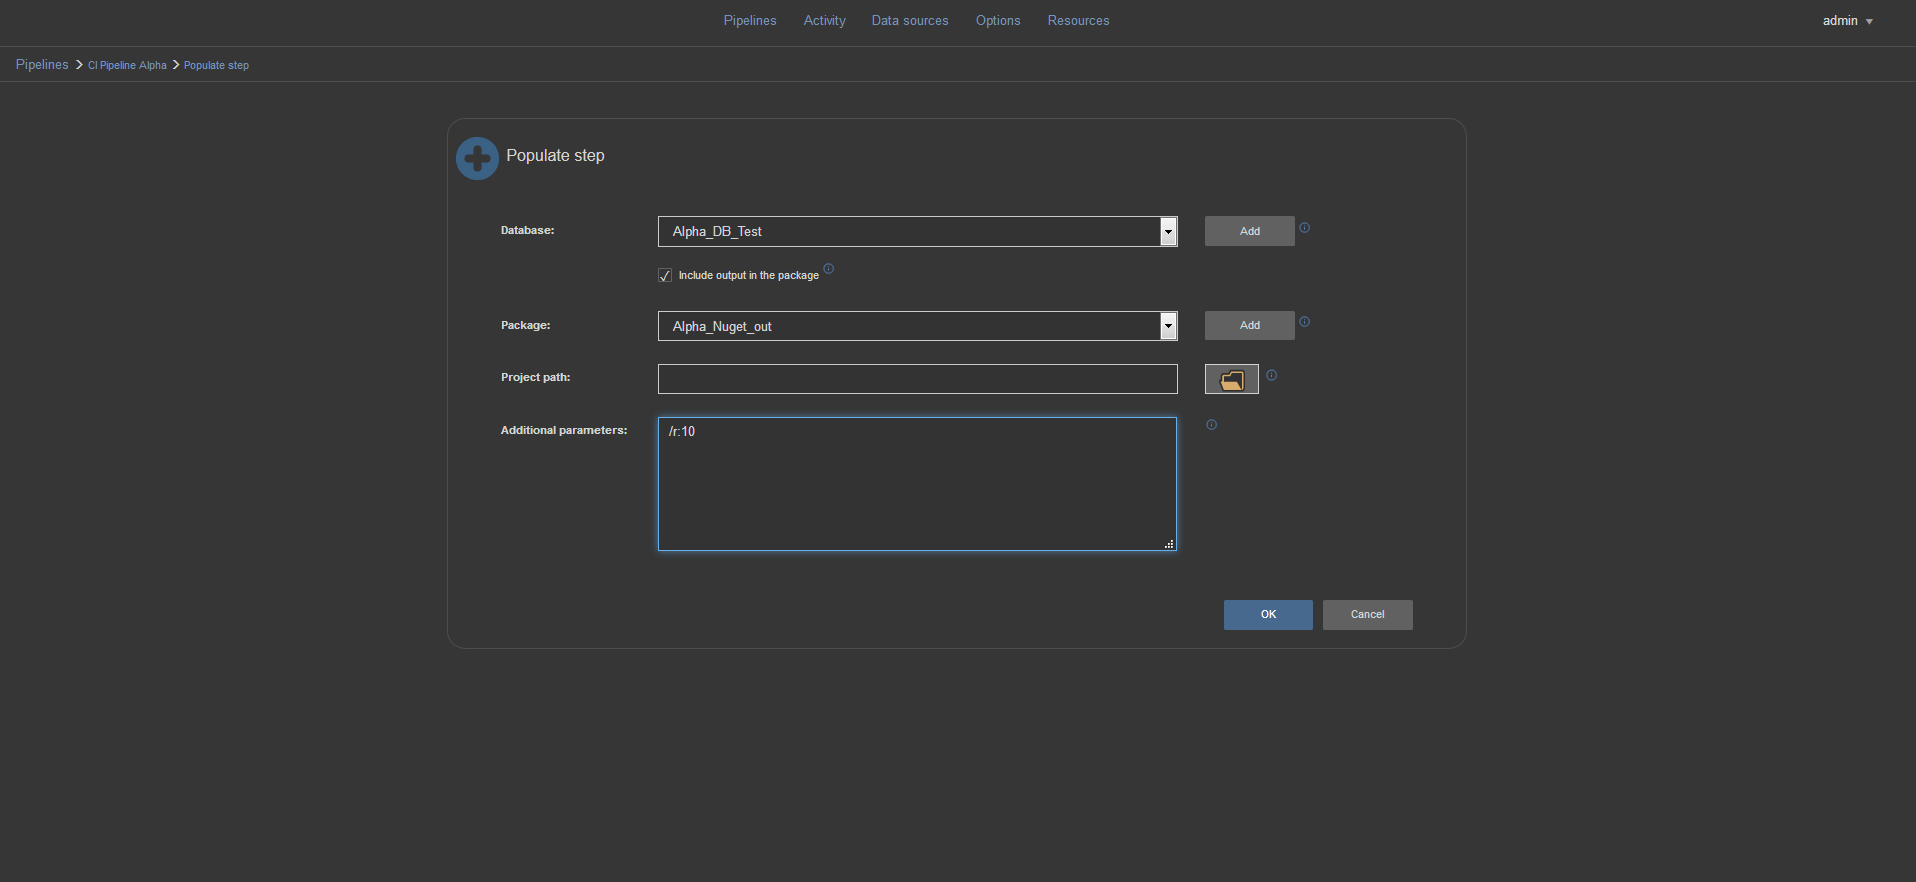
Adding the POPULATE step to your pipeline will fill empty tables in the target database with synthetic data for testing purposes. In this step, a target database needs to be selected and optionally a NuGet package for storing output in the form of the script that inserts test data can be specified. Also, an ApexSQL Generate application project file can be included and additional parameters with option switches can be set.
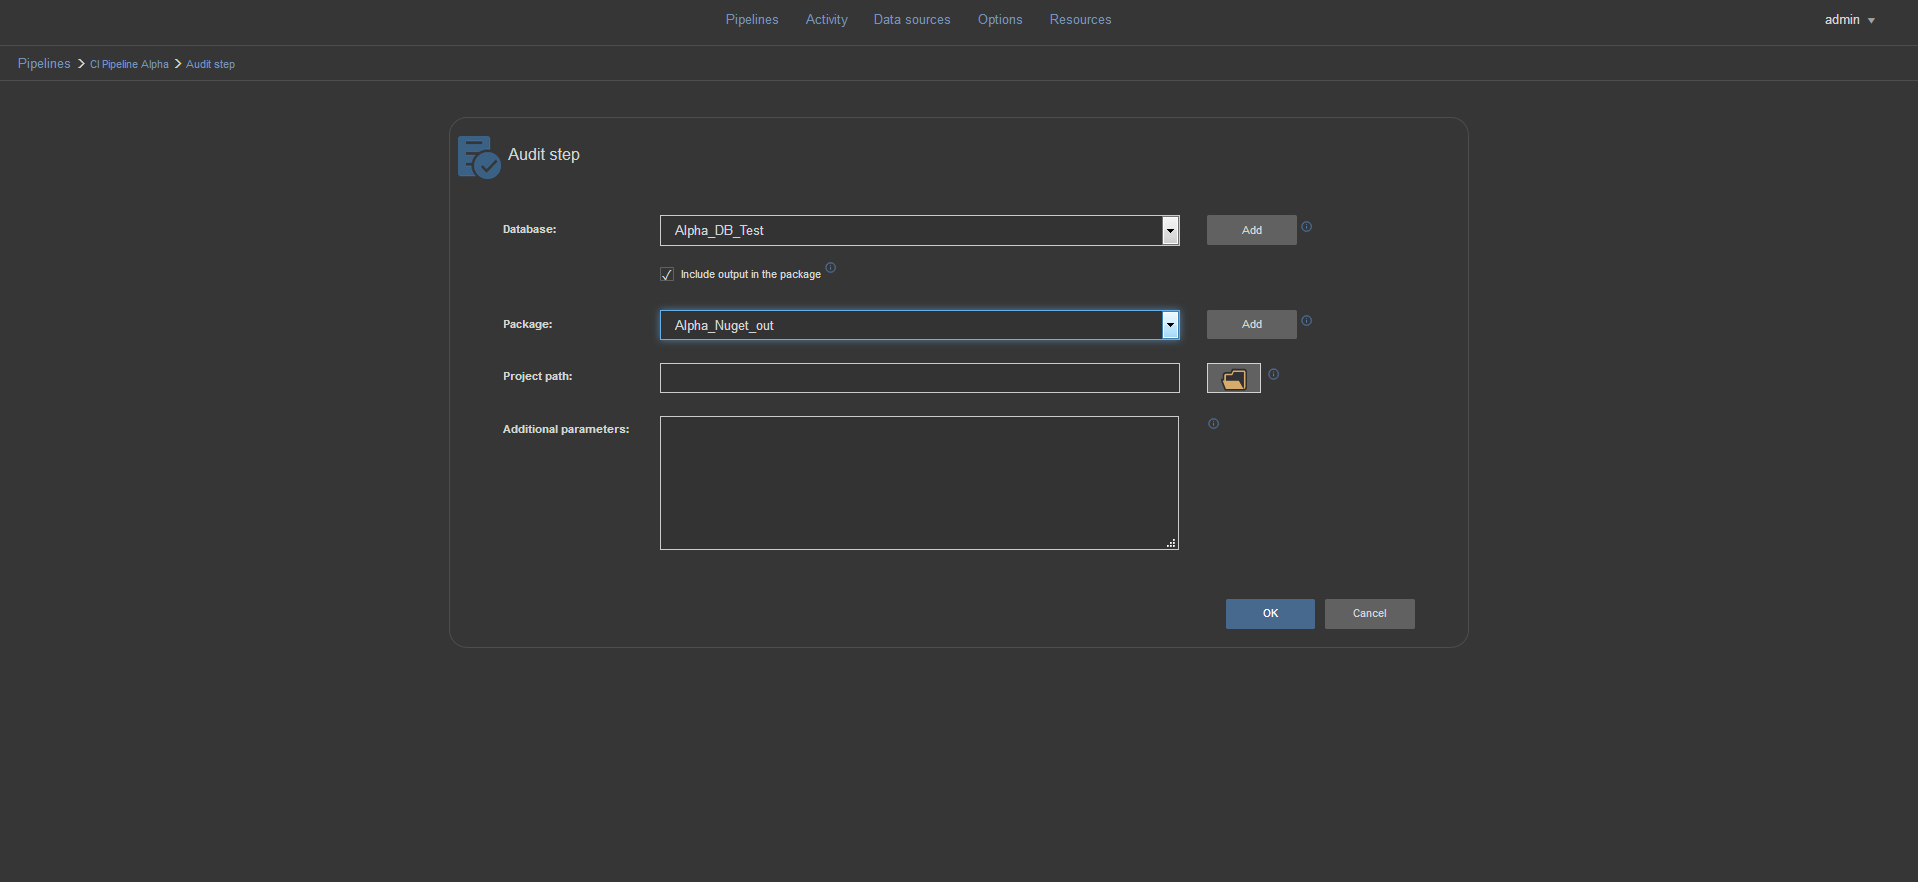
The AUDIT step will integrate trigger based audit trails for monitoring data changes to sensitive tables. Although data change auditing is the primary requirement, schema changes can be audited as well. To configure the Audit step, choose a target database and optionally a NuGet package to store the output script that implements the triggers. An ApexSQL Trigger application project file can be included along with any additional automation parameters.
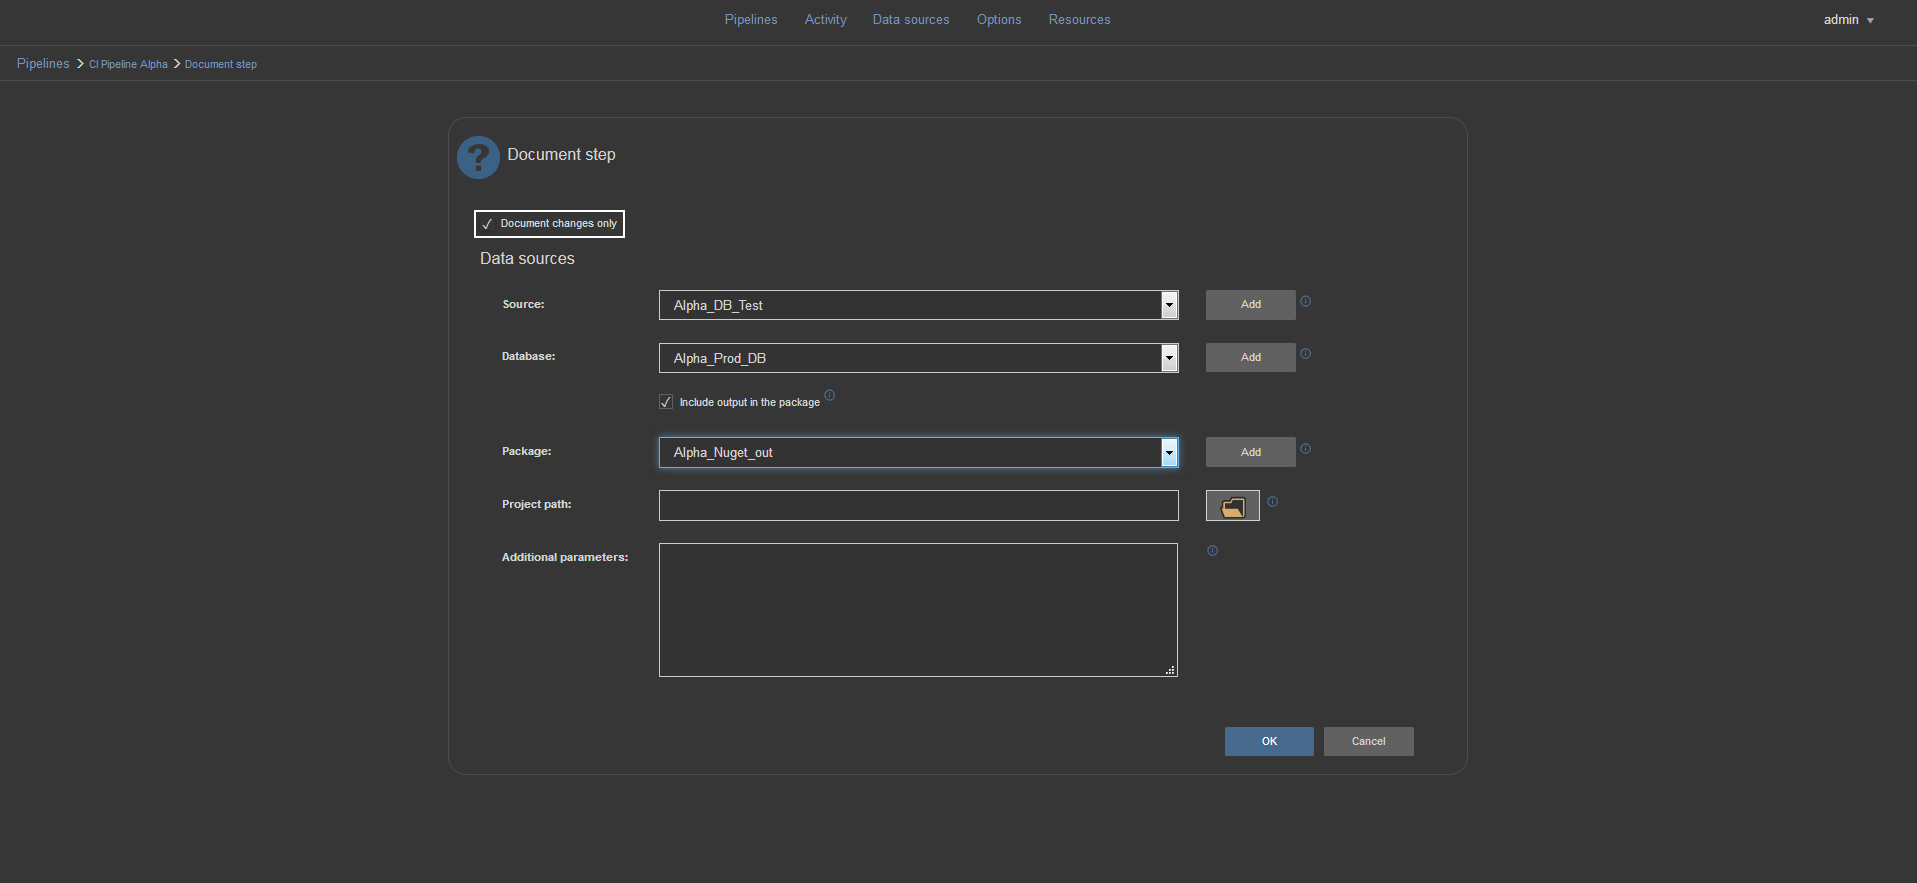
The DOCUMENT step will be used to document the newly built database or, as you may prefer, just changes to the database made in the most build. In the configuration view for this step, the target database needs to be added and optionally, a package for storing the output documentation. For additional customization, ApexSQL Doc application project file and additional command line parameters can be added.
When Document changes only option is checked, only differences between source and target databases will be documented.
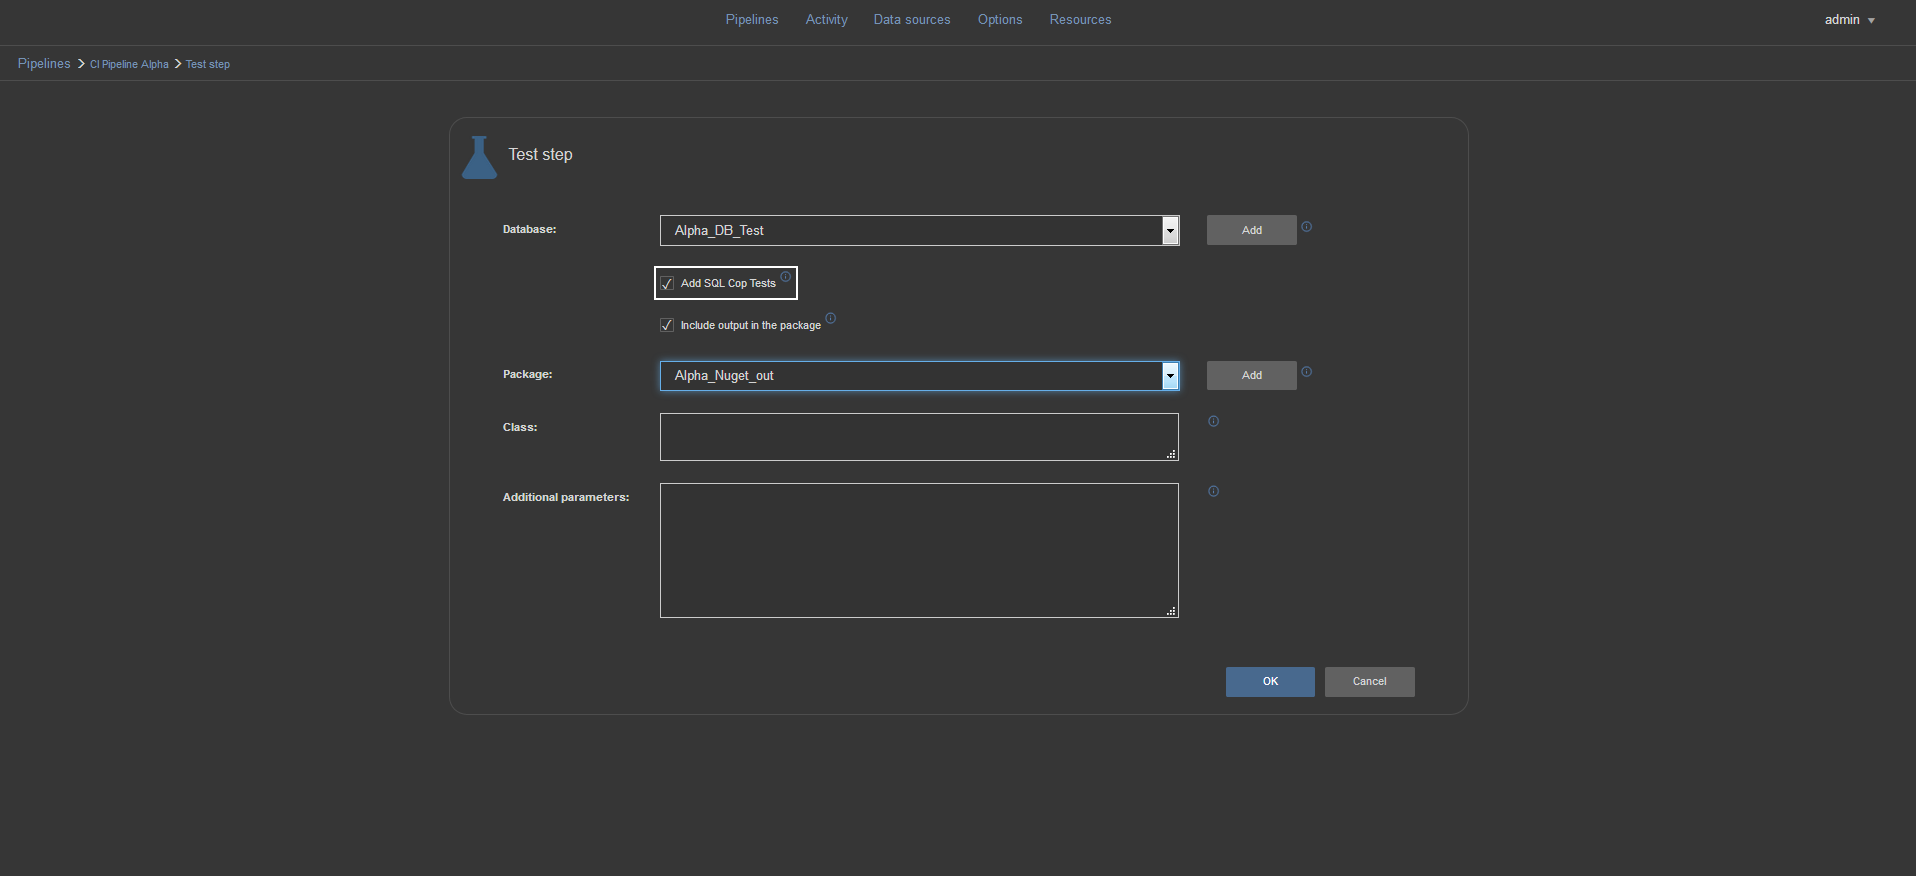
The TEST step will run unit tests on the target database. The step has a specific option to install a SQL Cop static code analysis process that will check the database against a set of best practices. In the configuration view, a target database is needed. There is also an option to specify a NuGet package to store test report output. A field is present for the ApexSQL Unit Test application class file which will include set of tests created with the application, and, just like in other steps, a field for additional command line options exists to provide any command line override instructions.
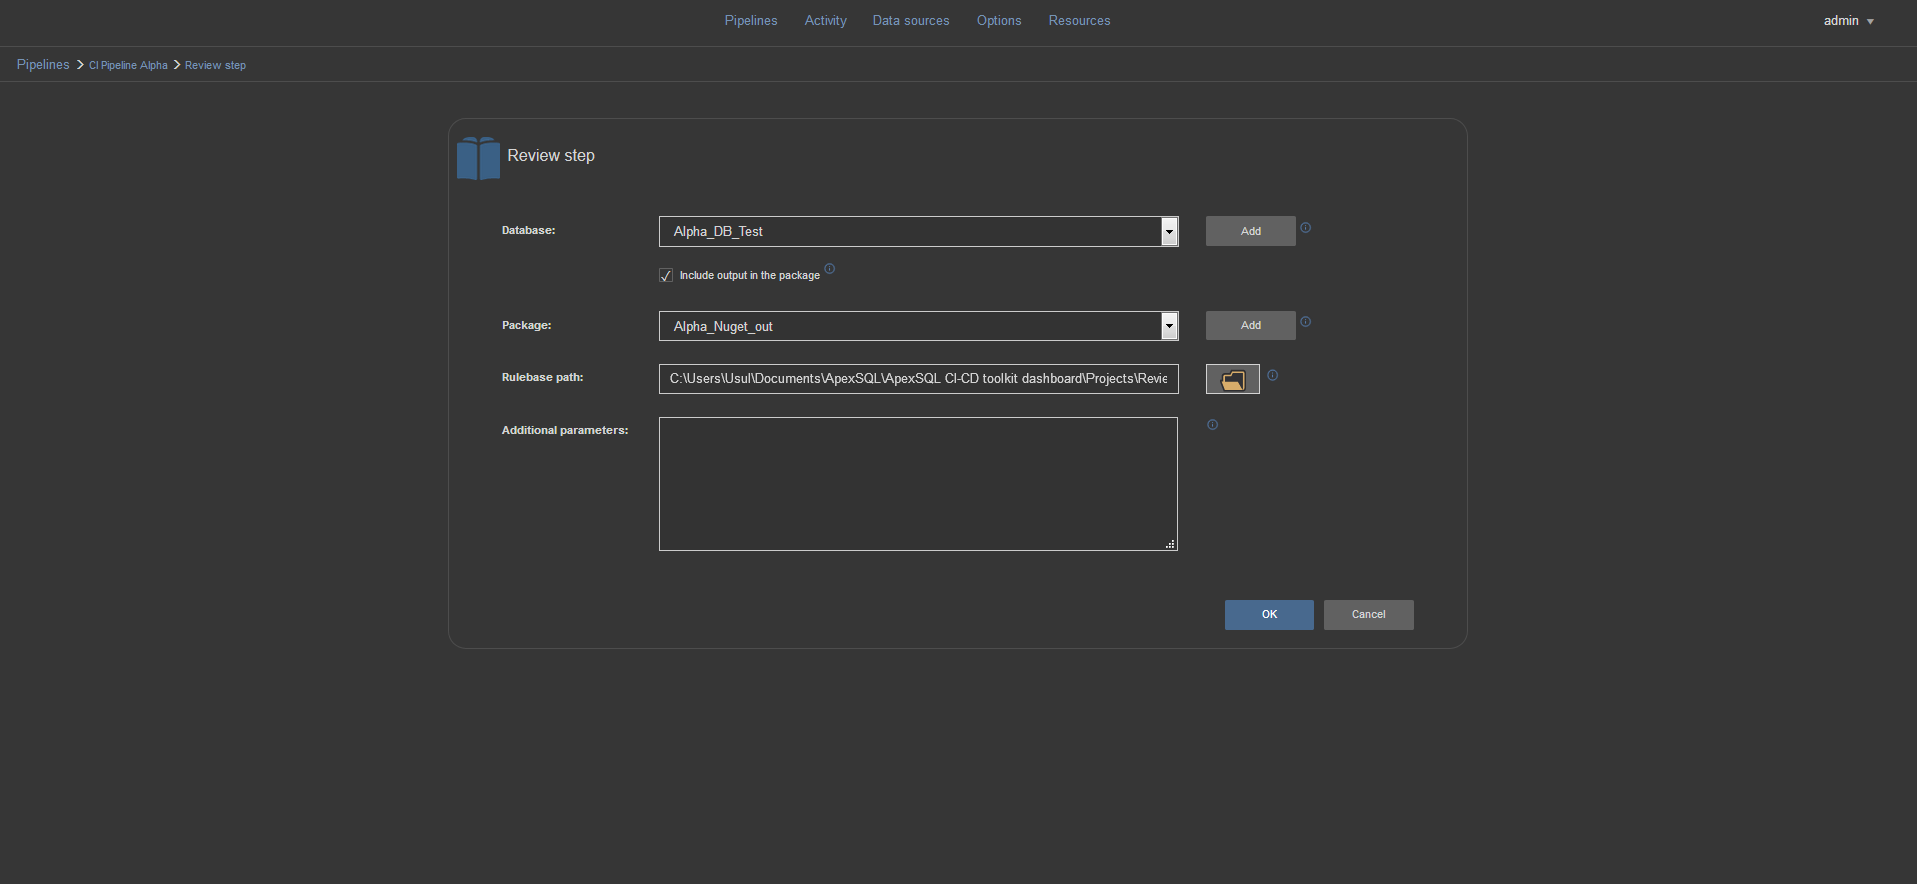
Add the REVIEW step to process the test target database against a set of SQL coding best practices, enforce standards and fail the pipeline if the standards aren’t met. The step configuration view includes the standard selection option for a target database and a NuGet package for review report output files. In order for this step to work, a rulebase file has to be included so the path to a rulebase created with ApexSQL Enforce needs to be defined.
The PACKAGE step will create a script folder of the tested database using the ApexSQL Script application, without any synthetic test data. The script folder will be used in the CD process for comparison with the production database and it contents packed into a NuGet package with the output results of the other executed steps, which will then be ready for the review and delivery process.

The second group of steps will be commonly used with the continuous delivery pipeline configuration.
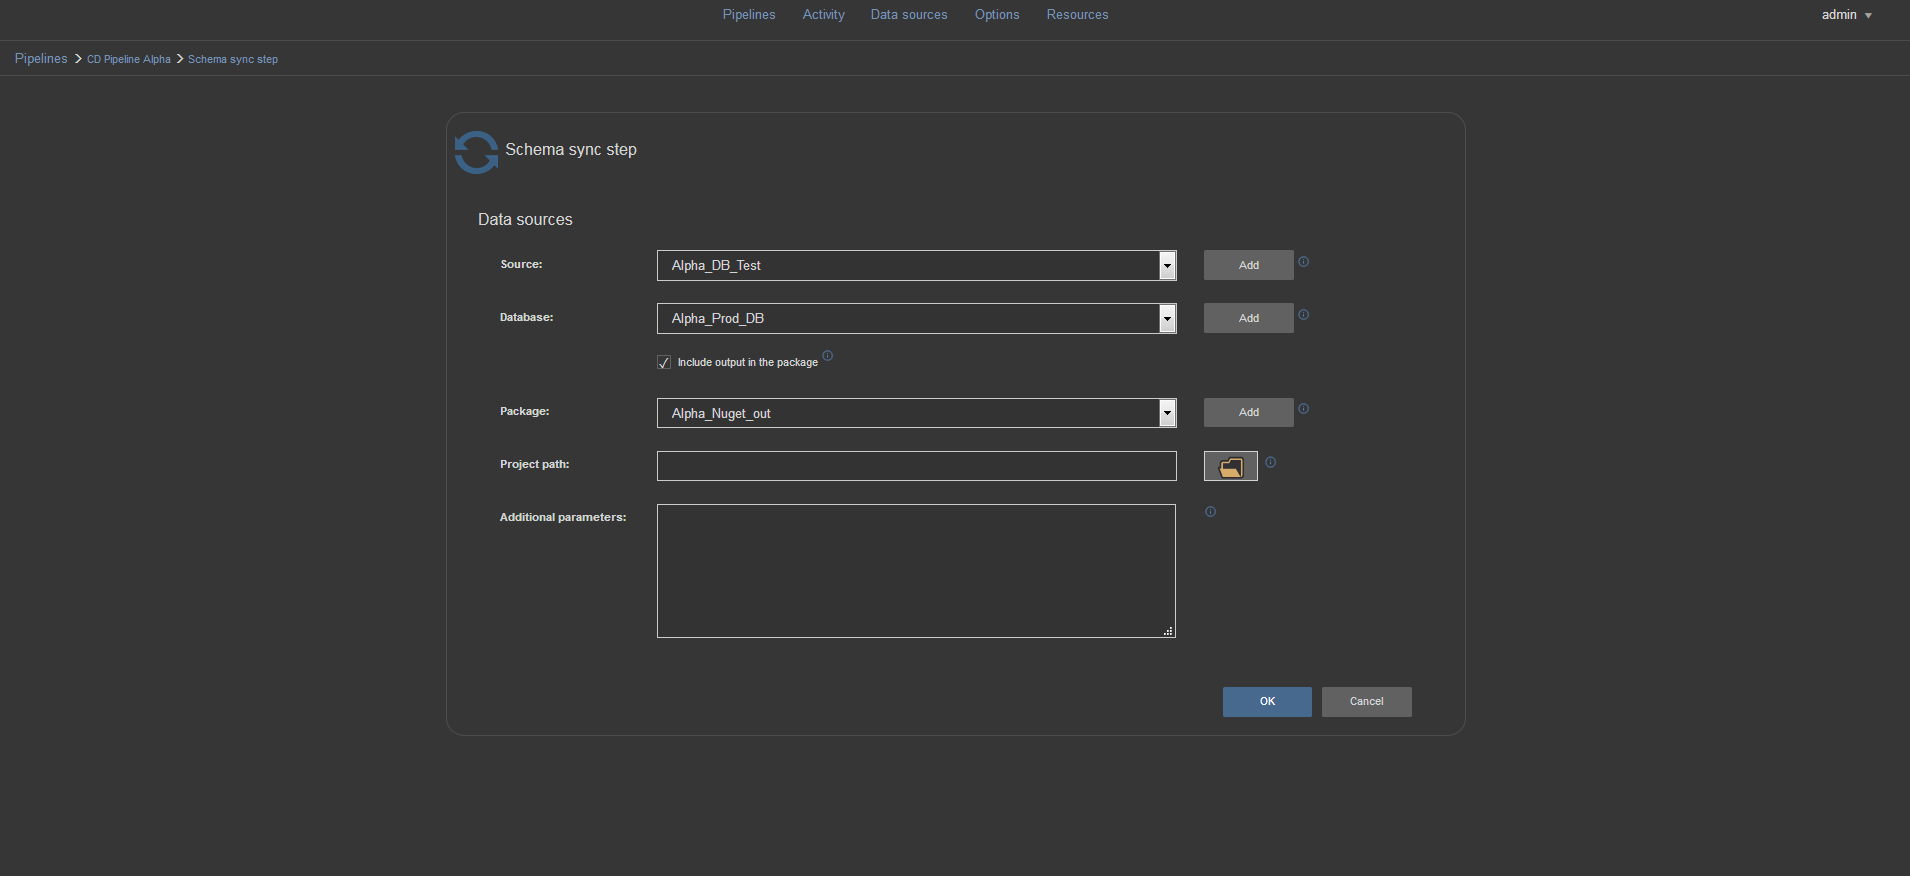
The SCHEMA SYNC step is the initial step for deployment of changes to a production environment. In this step, the tested database that has committed changes, will be compared with a target or production database and the result will be a schema synchronization script for updating changes. An ApexSQL Diff application project file can be included in this step along with optional additional parameters.
The optional DATA SYNC step compares static data of the source database to the destination database and creates data synchronization script which will later update the target or production database with any static data changes. An ApexSQL Data Diff application project file can be included in this step along with any optional additional command line parameters.

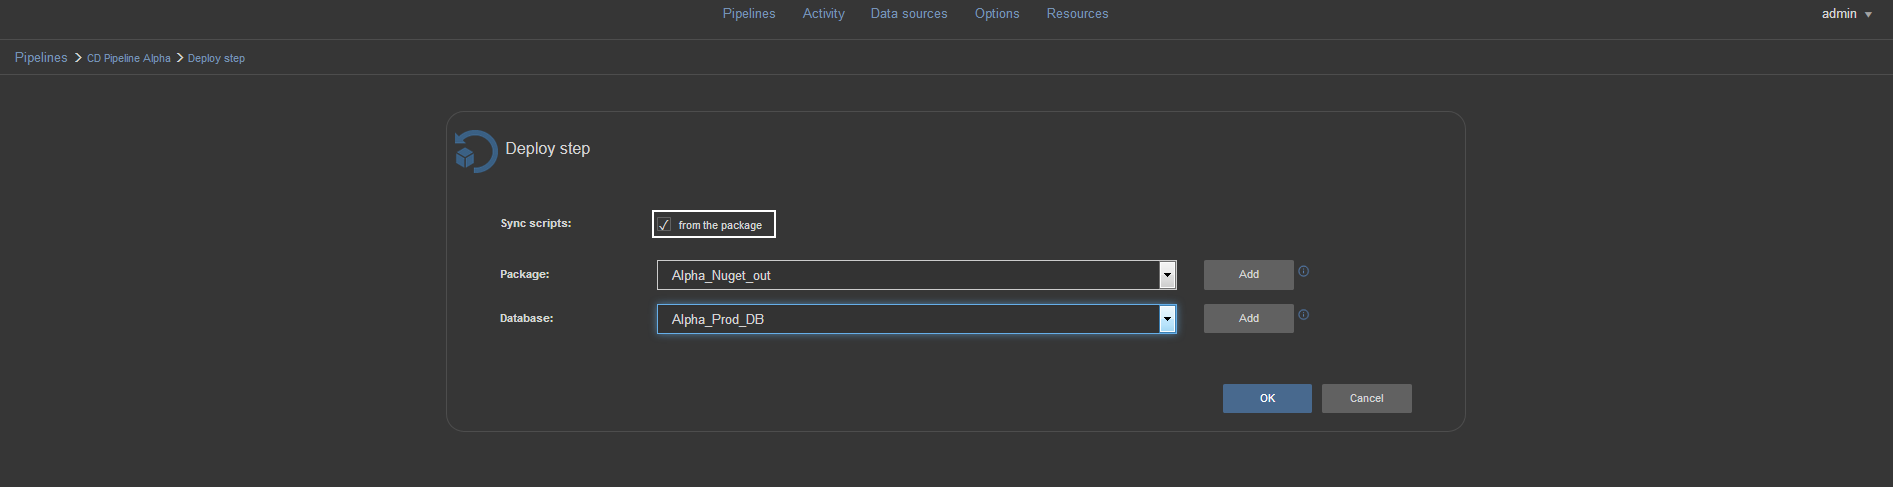
This DEPLOY step executes the previously created schema and data synchronization scripts and updates the selected target database with changes. As a data source, it is possible to directly pick synchronization scripts from their location. Alternatively, by checking the From the package option it’s possible to choose a NuGet package which includes the sync scripts created in previous steps.
With Shema sync, Data sync and Deploy steps added to the CD pipeline, after execution, the production database will be updated with all the committed database changes, previously tested and verified.
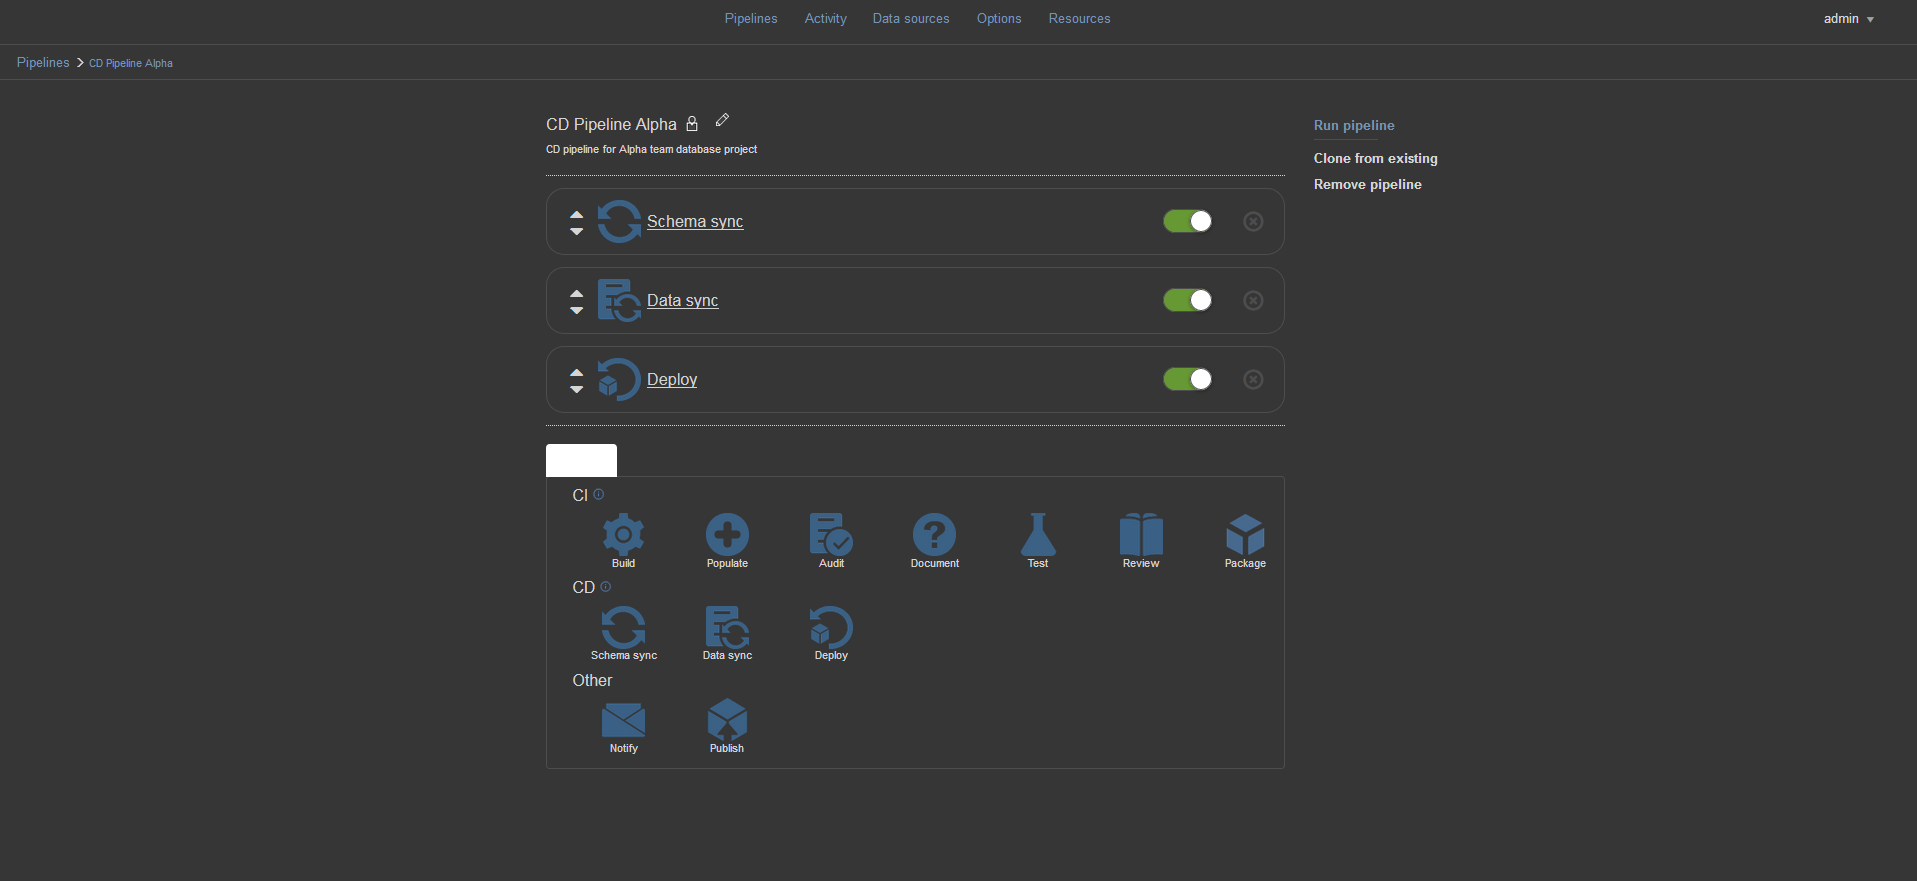
There are two optional steps that can be used with the pipelines.
The NOTIFY step can be configured to send email notifications about pipeline and step execution results. The message can be constructed with a combination of static text and execution parameters. In the Send to field recipients email addresses can be specified

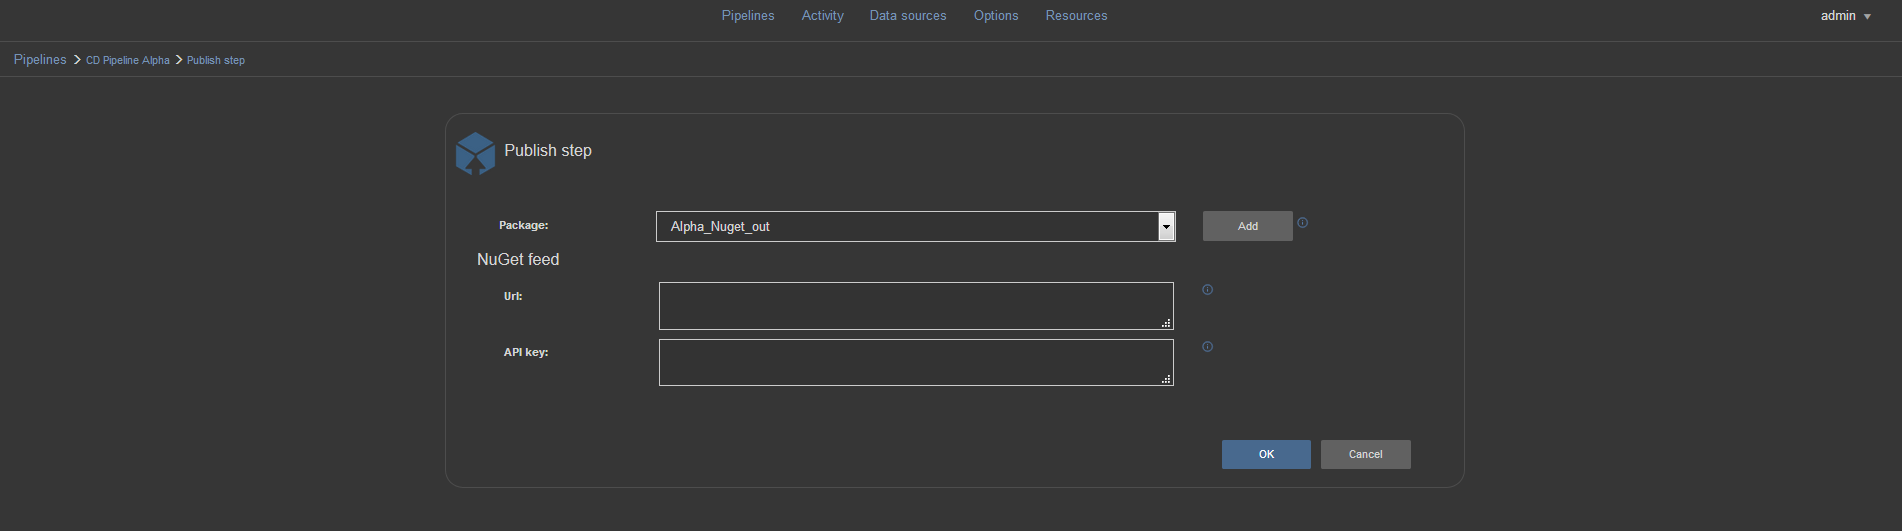
This PUBLISH step publishes the created NuGet package with output results to the designated NuGet feed. For this purpose, the URL for the NuGet feed and proper API key have to be included.
When the setup for the pipeline is completed with all the steps configured and arranged, the pipeline is ready for execution.
This concludes the overview video of the continuous integration and delivery steps of the ApexSQL DevOps toolkit Web Dashboard.
Thanks for watching. For more information, go to apexsql.com
See more:
An introduction to ApexSQL DevOps toolkit Web Dashboard


